Boa noite galera, este é o meu primeiro post, então se estiver no lugar errado peço desculpas.
Bom vamos ao trabalho, eu estava pesquisando aqui no forum e achei um esquema do LCD DashBoard neste link aqui viewtopic.php?f=40&t=1083&hilit=lcd+obd2 .
Peguei o codigo que foi postado e botei no meu arduino uno com o meu lcd 16x2.
Ele le o codigo tudo certinho porem eu não faço a minima ideia de como configurar o X-SIM pra mandar as informações pro arduino.
Conto com a ajuda de vocês, grande abraços.
Marcello
marcello@pws.net.br
LCD DashBoard
Moderator: tonquites
8 posts
• Page 1 of 1
LCD DashBoard
![]() by mvdias » Fri 21. Mar 2014, 02:33
by mvdias » Fri 21. Mar 2014, 02:33
- mvdias
- Posts: 2
- Joined: Fri 28. Feb 2014, 06:10
- Has thanked: 0 time
- Been thanked: 0 time
Re: LCD DashBoard
![]() by sirnoname » Fri 21. Mar 2014, 08:43
by sirnoname » Fri 21. Mar 2014, 08:43
Extractor -> Settings -> OBD2 -> add your arduino comport, thats all 
Tell more about the used game, make screenshots of current situation in extractor.
Tell more about the used game, make screenshots of current situation in extractor.
If a answer is correct or did help you for a solution, please use the solve button.
-

sirnoname - Site Admin
- Posts: 1829
- Images: 45
- Joined: Thu 1. Sep 2011, 22:02
- Location: Munich, Germany
- Has thanked: 35 times
- Been thanked: 129 times
Re: LCD DashBoard
![]() by mvdias » Sun 23. Mar 2014, 00:31
by mvdias » Sun 23. Mar 2014, 00:31
Obrigado Sirnoname, segui oque você falou e deu certo, está tudo funcionando 100%.
Mas eu gostaria de saber como faço para puxar mais informações do jogo para o LCD, olhei alguns Dashboard que a pessoa aperta um botão e mudas as informações no LCD.
Obrigado pela ajuda de vocês.
----------------------------------------------
Google Translate.
Thanks Sirnoname, I followed what you said and it worked, everything is working 100%.
But I would like to know how do I get more information of the game for the LCD, I looked at some Dashboard (the person presses a button and mute the information on the LCD).
Thanks for your help.
- mvdias
- Posts: 2
- Joined: Fri 28. Feb 2014, 06:10
- Has thanked: 0 time
- Been thanked: 0 time
Re: LCD DashBoard
![]() by bahzitchiu » Sat 19. Jul 2014, 14:53
by bahzitchiu » Sat 19. Jul 2014, 14:53
Oq fiz:
Andei postando minhas experiências em outro tópico, mas como ali tá meio "morto" quem sabe aqui o negócio anda para frente. Consegui fazer funcionar no rfactor, rfactor 2, game stock car extreme, formula truck 2013, assetto corsa e euro truck simulator 2.
No assetto corsa e no euro truck só consigo "pegar" rpm, velocidade e marchas (usando OBD II). Nos outros games, além desses itens pego posição, numero da volta, melhor volta. No assetto corsa consigo pegar o tempo total da corrida, mas não a best lap nem o tempo de volta hahahaha. Combustível não consegui fazer funcionar,(ainda). To tentando implementar um código meio "universal" já q esse display 16x2 é bem barato, mais para frente planejo pegar um de oled pq tem o refresh rate maior, ilumina mais e não tem necessidade de backlight.
Segue meus códigos ai:
PS: Esse código é para game stock car extreme, rfactor 2, assetto corsa.
PS2: para arrumar o "gear" no assetto corsa mude "gear == x" to "gear == x+1";
Código para euro truck 2 com 12 marchas
Andei postando minhas experiências em outro tópico, mas como ali tá meio "morto" quem sabe aqui o negócio anda para frente. Consegui fazer funcionar no rfactor, rfactor 2, game stock car extreme, formula truck 2013, assetto corsa e euro truck simulator 2.
No assetto corsa e no euro truck só consigo "pegar" rpm, velocidade e marchas (usando OBD II). Nos outros games, além desses itens pego posição, numero da volta, melhor volta. No assetto corsa consigo pegar o tempo total da corrida, mas não a best lap nem o tempo de volta hahahaha. Combustível não consegui fazer funcionar,(ainda). To tentando implementar um código meio "universal" já q esse display 16x2 é bem barato, mais para frente planejo pegar um de oled pq tem o refresh rate maior, ilumina mais e não tem necessidade de backlight.
Segue meus códigos ai:
- Code: Select all
//  X-Sim Sample code for receiving OBD2 values from the extractor without using the converter
//  OBD2 is industry standard, X-Sim will additionally expand the OBD2 PID with gear and other values
//
//  Usage:
//  Arduino has to be connected to a free USB port on the computer where the extractor is running
//  Open the extractor and open the settings menu, there you have to select the OBD2 menu
//  Add now your arduino comport to the OBD2 list.
//  After closing the dialog you will see the arduino LED will be enabled which represents receiving data.
//  After closing the extractor application the LED will switch off.
//  Use this code to insert your own display code at the fitting positions
//  Copyright 2013 Martin Wiedenbauer, X-Sim.de
//  New procedures ideias by bahzitchiu
//  Share for free
//  References:
//  http://en.wikipedia.org/wiki/OBD-II_PIDs
//  http://elmelectronics.com/DSheets/ELM327DS.pdf
//  http://www.x-sim.de

#include <LiquidCrystal.h>
LiquidCrystal lcd(12,11,5,4,3,2);
char gas[6] = "F";
char lugar[8] = "P";
char lap[7] = "L";
char rapport[5] = "Gear";
char trmin[5] = "RPM";
char speed1[8] = "SPEED";
char speedunit[5] = "KM/H";
char marcha[16] = "";
char message[16] = "";
unsigned int rpmmax = 100;
unsigned int rpmlast;
int setrpm = 0;
int mode = 1;
int rpm, speed, gear, position, currentlap, lapp, c,d;
long bestlaptime,lastlaptime,laptime,delta,time,alfa;
bool extractordetected=false;
int receivebuffer[100]={
  0};
byte bar1[8] =
{
  B11100,
  B11110,
  B11110,
  B11110,
  B11110,
  B11110,
  B11110,
  B11100
};
byte bar2[8] =
{
  B00111,
  B01111,
  B01111,
  B01111,
  B01111,
  B01111,
  B01111,
  B00111
};
byte bar3[8] =
{
  B11111,
  B11111,
  B00000,
  B00000,
  B00000,
  B00000,
  B11111,
  B11111
};
byte bar4[8] =
{
  B11110,
  B11100,
  B00000,
  B00000,
  B00000,
  B00000,
  B11000,
  B11100
};
byte bar5[8] =
{
  B01111,
  B00111,
  B00000,
  B00000,
  B00000,
  B00000,
  B00111,
  B01111
};
byte bar6[8] =
{
  B00000,
  B00000,
  B00000,
  B00000,
  B00000,
  B00000,
  B11111,
  B11111
};
byte bar7[8] =
{
  B00000,
  B00000,
  B00000,
  B00000,
  B00000,
  B00000,
  B00111,
  B01111
};
byte bar8[8] =
{
  B11111,
  B11111,
  B00000,
  B00000,
  B00000,
  B00000,
  B00000,
  B00000
};

void setup()

{
  lcd.createChar(1,bar1);
  lcd.createChar(2,bar2);
  lcd.createChar(3,bar3);
  lcd.createChar(4,bar4);
  lcd.createChar(5,bar5);
  lcd.createChar(6,bar6);
  lcd.createChar(7,bar7);
  lcd.createChar(8,bar8);

  lcd.begin(16, 2);
  pinMode(13, OUTPUT);
  digitalWrite(13, HIGH);
  Serial.begin(9600);
  lcd.begin(16, 2);
  lcd.print("   X-SIM DASH");
  delay(3000);
  lcd.clear();
}

int HexToInt(int c)
{
  if (c >= '0' && c <= '9')
  {
    return c - '0';
  }
  else if (c >= 'a' && c <= 'f')
  {
    return c - 'a' + 10;
  }
  else if (c >= 'A' && c <= 'F')
  {
    return c - 'A' + 10;
  }
  else
  {
    return -1;
  }
}


int ReceiveValueWithTimeout(int receivetrigger, int commandhighbyte, int commandlowbyte, int receivelength)
{
  int arduinoserialbuffer = 0;
  int buffercount = -1;
  for (int z = 0; z < 1500; z++)
  {
    while (Serial.available())
    {
      if (buffercount == -1)
      {
        arduinoserialbuffer = Serial.read();
        if (arduinoserialbuffer != receivetrigger)
        {
          buffercount = -1;
        }
        else
        {
          buffercount = 0;
        }
      }
      else
      {
        arduinoserialbuffer = Serial.read();
        receivebuffer[buffercount] = arduinoserialbuffer;
        buffercount++;
        if (buffercount > receivelength)
        {
          return ParseReceiveBufferOffset(commandhighbyte, commandlowbyte, receivelength, 0);
          buffercount = -1;
        }
      }
    }
    delay(1);
  }
  return -1;
}

long ParseReceiveBufferOffset(int commandhighbyte, int commandlowbyte, int receivelength, int offset)
{

  if (receivebuffer[0] == '1' && receivebuffer[2] == commandhighbyte && receivebuffer[3] == commandlowbyte)
  {

    if (receivelength == 7)
    {
      int highresult = HexToInt(receivebuffer[offset + 5]);
      int lowresult = HexToInt(receivebuffer[offset + 6]);
      if (highresult == -1 || lowresult == -1){
        return -1;
      }
      return ((16 * highresult) + lowresult);
    }

    if (receivelength == 10)
    {
      int tophighresult = HexToInt(receivebuffer[offset + 5]);
      int toplowresult = HexToInt(receivebuffer[offset + 6]);
      int highresult = HexToInt(receivebuffer[offset + 8]);
      int lowresult = HexToInt(receivebuffer[offset + 9]);
      if (tophighresult == -1 || toplowresult == -1 || highresult == -1 || lowresult == -1){
        return -1;
      }
      return ((4096 * tophighresult) + (256 * toplowresult) + (16 * highresult) + lowresult);
    }

    if (receivelength == 16)
    {
      int tophighresult = HexToInt(receivebuffer[offset + 5]);
      int toplowresult = HexToInt(receivebuffer[offset + 6]);
      int highresult = HexToInt(receivebuffer[offset + 8]);
      int lowresult = HexToInt(receivebuffer[offset + 9]);
      int tophighresult2 = HexToInt(receivebuffer[offset + 11]);
      int toplowresult2 = HexToInt(receivebuffer[offset + 12]);
      int highresult2 = HexToInt(receivebuffer[offset + 14]);
      int lowresult2 = HexToInt(receivebuffer[offset + 15]);

      if (tophighresult2 == -1 || toplowresult2 == -1 || highresult2 == -1 || lowresult2 == -1 || tophighresult == -1 || toplowresult == -1 || highresult == -1 || lowresult == -1){
        return -1;
      }
      return ((268435456 * tophighresult) + (16777216 * toplowresult) + (1048576 * highresult) + (65536 * lowresult) + (4096 * tophighresult2) + (256 * toplowresult2) + (16 * highresult2) + lowresult2);
    }

  }
  return -1;
}

bool ReceiveAllValuesWithTimeout(int receivetrigger, int commandhighbyte, int commandlowbyte, int receivelength)
{
  int arduinoserialbuffer = 0;
  int buffercount = -1;
  for (int z = 0; z < 1500; z++)
  {
    while (Serial.available())
    {
      if (buffercount == -1)
      {
        arduinoserialbuffer = Serial.read();
        if (arduinoserialbuffer != receivetrigger)
        {
          buffercount = -1;
        }
        else
        {
          buffercount = 0;
        }
      }
      else
      {
        arduinoserialbuffer = Serial.read();
        receivebuffer[buffercount] = arduinoserialbuffer;
        buffercount++;
        if (buffercount > receivelength)
        {
          return true;
          buffercount = -1;
        }
      }
    }
    delay(1);
  }
  return false;
}

void getAllData()
{
  ClearReceiveBuffer();
  Serial.write('0');
  Serial.write('1');
  Serial.write('E');
  Serial.write('F');
  Serial.write('\r');
  if (ReceiveAllValuesWithTimeout('4', 'E', 'F', 42))
  {
    rpm = ParseReceiveBufferOffset('E', 'F', 10, 0);
    speed = ParseReceiveBufferOffset('E', 'F', 10, 6);
    gear = ParseReceiveBufferOffset('E', 'F', 7, 15);
    position = ParseReceiveBufferOffset('E', 'F', 7, 18);
    currentlap = ParseReceiveBufferOffset('E', 'F', 7, 21);
    bestlaptime = ParseReceiveBufferOffset('E', 'F', 16, 24);
  }
}

void ClearReceiveBuffer()
{
  while (Serial.available())
  {
    Serial.read();
  }
}

void SendEchoDisabled()
{

  Serial.write('A');
  Serial.write('T');
  Serial.write('E');
  Serial.write('0');
  Serial.write('\r');
}


int GetOBD2RpmValue()
{

  ClearReceiveBuffer();
  Serial.write('0');
  Serial.write('1');
  Serial.write('0');
  Serial.write('c');
  Serial.write('\r');
  return ReceiveValueWithTimeout('4', '0', 'C', 10);
}


int GetOBD2SpeedValue()
{

  ClearReceiveBuffer();
  Serial.write('0');
  Serial.write('1');
  Serial.write('0');
  Serial.write('d');
  Serial.write('\r');
  return ReceiveValueWithTimeout('4', '0', 'D', 7);
}


int GetOBD2GearValue()
{

  ClearReceiveBuffer();
  Serial.write('0');
  Serial.write('1');
  Serial.write('e');
  Serial.write('0');
  Serial.write('\r');
  return ReceiveValueWithTimeout('4', 'E', '0', 7);
}


int GetOBD2PositionValue()
{

  ClearReceiveBuffer();
  Serial.write('0');
  Serial.write('1');
  Serial.write('e');
  Serial.write('1');
  Serial.write('\r');
  return ReceiveValueWithTimeout('4', 'E', '1', 7);
}

int GetOBD2SpeedValue_new()
{

  ClearReceiveBuffer();
  Serial.write('0');
  Serial.write('1');
  Serial.write('e');
  Serial.write('1');
  Serial.write('\r');
  return ReceiveValueWithTimeout('4', 'E', '1', 7);
}

void loop()
{

  int          i;
  char*          neutral = "n";
  char*          reverse = "r";
  unsigned int    rpmleds;
  char          message[8];
  String          output;
  int            hours;
  int            mins;
  int            secs;
  int            millisec;
  long         inttime;

  gear = GetOBD2GearValue();
  c=0;
  d=0;
  while (gear >= 0)
  {

    if (extractordetected == false)
    {
      SendEchoDisabled();
      extractordetected = true;
    }

    getAllData();
    lapp=currentlap;


    if (rpmmax < rpmlast)
      rpmmax = rpmlast + 100;


    if (gear==0){

      sprintf(message,"%s:%s",rapport, reverse);
      lcd.setCursor(4, 1);
      lcd.write(2);
      lcd.write(8);
      rpmleds = map(rpm, 0, rpmmax, 0, 20);
      if (rpmleds >= 19) {
        delay(100);
        lcd.clear();
      }

    }


    if (gear==1){
      sprintf(marcha,neutral);
      lcd.setCursor(4, 1);
      lcd.write(2);
      lcd.write(8);
      lcd.write(1);
      rpmleds = map(rpm, 0, rpmmax, 0, 20);
      if (rpmleds >= 19) {
        delay(100);
        lcd.clear();
      }
    }


    if (gear==2){
      sprintf(message,"%s:%d",rapport, gear-1);
      lcd.setCursor(4,0);
      lcd.write(32);
      lcd.write(32);
      lcd.write(1);
      lcd.setCursor(4,1);
      lcd.write(32);
      lcd.write(32);
      lcd.write(1);
      rpmleds = map(rpm, 0, rpmmax, 0, 20);
      if (rpmleds >= 19) {
        delay(100);
        lcd.clear();
      }
    }


    if (gear==3){
      sprintf(message,"%s:%d",rapport, gear-1);
      lcd.setCursor(4,0);
      lcd.write(5);
      lcd.write(3);
      lcd.write(1);
      lcd.setCursor(4, 1);
      lcd.write(2);
      lcd.write(6);
      lcd.write(6);
      rpmleds = map(rpm, 0, rpmmax, 0, 20);
      if (rpmleds >= 19) {
        delay(100);
        lcd.clear();
      }
    }


    if (gear==4){
      sprintf(message,"%s:%d",rapport, gear-1);
      lcd.setCursor(4,0);
      lcd.write(5);
      lcd.write(3);
      lcd.write(1);
      lcd.setCursor(4, 1);
      lcd.write(7);
      lcd.write(6);
      lcd.write(1);
      rpmleds = map(rpm, 0, rpmmax, 0, 20);
      if (rpmleds >= 19) {
        delay(100);
        lcd.clear();
      }
    }


    if (gear==5){
      sprintf(message,"%s:%d",rapport, gear-1);
      lcd.setCursor(4,0);
      lcd.write(2);
      lcd.write(6);
      lcd.write(1);
      lcd.setCursor(4, 1);
      lcd.write(32);
      lcd.write(32);
      lcd.write(1);
      rpmleds = map(rpm, 0, rpmmax, 0, 20);
      if (rpmleds >= 19) {
        delay(100);
        lcd.clear();
      }
    }


    if (gear==6){
      sprintf(message,"%s:%d",rapport, gear-1);
      lcd.setCursor(4,0);
      lcd.write(2);
      lcd.write(3);
      lcd.write(4);
      lcd.setCursor(4, 1);
      lcd.write(7);
      lcd.write(6);
      lcd.write(1);
      rpmleds = map(rpm, 0, rpmmax, 0, 20);
      if (rpmleds >= 19) {
        delay(100);
        lcd.clear();
      }

    }


    if (gear==7){
      sprintf(message,"%s:%d",rapport, gear-1);
      lcd.setCursor(4,0);
      lcd.write(2);
      lcd.write(3);
      lcd.write(4);
      lcd.setCursor(4, 1);
      lcd.write(2);
      lcd.write(6);
      lcd.write(1);
      rpmleds = map(rpm, 0, rpmmax, 0, 20);
      if (rpmleds >= 19) {
        delay(100);
        lcd.clear();
      }

    }


    if (gear==8){
      sprintf(message,"%s:%d",rapport, gear-1);
      lcd.setCursor(4,0);
      lcd.write(2);
      lcd.write(8);
      lcd.write(1);
      lcd.setCursor(4, 1);
      lcd.write(32);
      lcd.write(32);
      lcd.write(1);
      rpmleds = map(rpm, 0, rpmmax, 0, 20);
      if (rpmleds >= 19) {
        delay(100);
        lcd.clear();
      }

    }


    if (gear==9){
      sprintf(message,"%s:%d",rapport, gear-1);
      lcd.setCursor(4, 0);
      lcd.write(2);
      lcd.write(3);
      lcd.write(1);
      lcd.setCursor(4, 1);
      lcd.write(2);
      lcd.write(6);
      lcd.write(1);
      rpmleds = map(rpm, 0, rpmmax, 0, 20);
      if (rpmleds >= 19) {
        delay(100);
        lcd.clear();
      }

    }


    if (gear==10){
      sprintf(message,"%s:%d",rapport, gear-1);
      lcd.setCursor(4, 0);
      lcd.write(2);
      lcd.write(3);
      lcd.write(1);
      lcd.setCursor(4, 1);
      lcd.write(7);
      lcd.write(6);
      lcd.write(1);
      rpmleds = map(rpm, 0, rpmmax, 0, 20);
      if (rpmleds >= 19) {
        delay(100);
        lcd.clear();
      }
    }

    {
      sprintf(message,"P%02d",position);
      lcd.setCursor(13,0);
      lcd.write(message);
      sprintf(message,"%3d",speed);
      lcd.setCursor(0,2);
      lcd.write(message);
      sprintf(message,"L%02d", currentlap);
      lcd.setCursor(0,0);
      lcd.write(message);

      if (bestlaptime < lastlaptime){
        sprintf(message, "BEST");
        lcd.setCursor(8,0);
        lcd.write(message);
      }
      else{
        sprintf(message, "    ");
        lcd.setCursor(8,0);
        lcd.write(message);
      }


      if (bestlaptime == -1)
      {
        sprintf(message, "000000");
      }
      else
      {
        inttime = bestlaptime / 1000;
        millisec = bestlaptime % 1000;
        hours = inttime / 3600;
        inttime = inttime % 3600;
        mins = inttime / 60;
        inttime = inttime % 60;
        secs = inttime;
        sprintf(message, "%1d:%02d.%003d", mins, secs, millisec);
        lcd.setCursor(8,1);
        lcd.write(message);
        lastlaptime=bestlaptime;
      }
      rpmlast = rpm;
    }
  }
  extractordetected = false;
  digitalWrite(13, HIGH);
  lcd.setCursor(0,0);
  lcd.write("[<-OPEN X-SIM->]");
  lcd.setCursor(0,2);
  lcd.write(" GAME STOCK CAR");
  delay(2000);
  lcd.clear();
}
PS: Esse código é para game stock car extreme, rfactor 2, assetto corsa.
PS2: para arrumar o "gear" no assetto corsa mude "gear == x" to "gear == x+1";
Código para euro truck 2 com 12 marchas
- Code: Select all
//  X-Sim Sample code for receiving OBD2 values from the extractor without using the converter
//  OBD2 is industry standard, X-Sim will additionally expand the OBD2 PID with gear and other values
//
//  Usage:
//  Arduino has to be connected to a free USB port on the computer where the extractor is running
//  Open the extractor and open the settings menu, there you have to select the OBD2 menu
//  Add now your arduino comport to the OBD2 list.
//  After closing the dialog you will see the arduino LED will be enabled which represents receiving data.
//  After closing the extractor application the LED will switch off.
//  Use this code to insert your own display code at the fitting positions
//  Copyright 2013 Martin Wiedenbauer, X-Sim.de
//
//  References:
//  http://en.wikipedia.org/wiki/OBD-II_PIDs
//  http://elmelectronics.com/DSheets/ELM327DS.pdf
//  http://www.x-sim.de

#include <LiquidCrystal.h>
LiquidCrystal lcd(12,11,5,4,3,2);

char rapport[5] = "Gear";
char trmin[5] = "RPM";
char speed1[8] = "SPEED";
char speedunit[5] = "KM/H";
char marcha[16] = "";
char message[16] = "";
unsigned int rpmmax = 100;
unsigned int rpmlast;
int setrpm = 0;
int mode = 1;
int rpm, speed, coolant, gear, position, currentlap, fuel,c;
long bestlaptime;
bool extractordetected=false;
int receivebuffer[100]={
  0};


byte bar1[8] =
{
  B11100,
  B11110,
  B11110,
  B11110,
  B11110,
  B11110,
  B11110,
  B11100
};
byte bar2[8] =
{
  B00111,
  B01111,
  B01111,
  B01111,
  B01111,
  B01111,
  B01111,
  B00111
};
byte bar3[8] =
{
  B11111,
  B11111,
  B00000,
  B00000,
  B00000,
  B00000,
  B11111,
  B11111
};
byte bar4[8] =
{
  B11110,
  B11100,
  B00000,
  B00000,
  B00000,
  B00000,
  B11000,
  B11100
};
byte bar5[8] =
{
  B01111,
  B00111,
  B00000,
  B00000,
  B00000,
  B00000,
  B00111,
  B01111
};
byte bar6[8] =
{
  B00000,
  B00000,
  B00000,
  B00000,
  B00000,
  B00000,
  B11111,
  B11111
};
byte bar7[8] =
{
  B00000,
  B00000,
  B00000,
  B00000,
  B00000,
  B00000,
  B00111,
  B01111
};
byte bar8[8] =
{
  B11111,
  B11111,
  B00000,
  B00000,
  B00000,
  B00000,
  B00000,
  B00000
};


void setup()

{
  // assignes each segment a write number
  lcd.createChar(1,bar1);
  lcd.createChar(2,bar2);
  lcd.createChar(3,bar3);
  lcd.createChar(4,bar4);
  lcd.createChar(5,bar5);
  lcd.createChar(6,bar6);
  lcd.createChar(7,bar7);
  lcd.createChar(8,bar8);

  // sets the LCD's rows and colums:
  lcd.begin(16, 2);
  pinMode(13, OUTPUT); //Arduino UNO LED off
  digitalWrite(13, HIGH);
  Serial.begin(9600);//9600
  //Do here stuff to init display and zero to default
  lcd.begin(16, 2);
  lcd.print("   X-SIM DASH");
  delay(3000);
  lcd.clear();
}

int HexToInt(int c)
{
  if (c >= '0' && c <= '9')
  {
    return c - '0';
  }
  else if (c >= 'a' && c <= 'f')
  {
    return c - 'a' + 10;
  }
  else if (c >= 'A' && c <= 'F')
  {
    return c - 'A' + 10;
  }
  else
  {
    return -1; // getting here is bad: it means the character was invalid
  }
}

//This function will wait for the first character in receivetrigger and will parse the result
int ReceiveValueWithTimeout(int receivetrigger, int commandhighbyte, int commandlowbyte, int receivelength)
{
  int arduinoserialbuffer = 0;
  int buffercount = -1;
  for (int z = 0; z < 1500; z++) //500ms timeout should be enough
  {
    while (Serial.available())
    {
      if (buffercount == -1)
      {
        arduinoserialbuffer = Serial.read();
        if (arduinoserialbuffer != receivetrigger) //Wait until the trigger is reached, ignore echo, first character is not in the buffer
        {
          buffercount = -1;
        }
        else
        {
          buffercount = 0;
        }
      }
      else
      {
        arduinoserialbuffer = Serial.read();
        receivebuffer[buffercount] = arduinoserialbuffer;
        buffercount++;
        if (buffercount > receivelength) //buffer has now waitlen character length
        {
          return ParseReceiveBufferOffset(commandhighbyte, commandlowbyte, receivelength, 0);
          buffercount = -1;
        }
      }
    }
    delay(1);
  }
  return -1;
}

long ParseReceiveBufferOffset(int commandhighbyte, int commandlowbyte, int receivelength, int offset)
{
  //First character is removed of the receivebuffer string and must not be verified again
  if (receivebuffer[0] == '1' && receivebuffer[2] == commandhighbyte && receivebuffer[3] == commandlowbyte)
  {
    //Parse 2 byte values on position 5 and 6 in the buffer string
    if (receivelength == 7)
    {
      int highresult = HexToInt(receivebuffer[offset + 5]);
      int lowresult = HexToInt(receivebuffer[offset + 6]);
      if (highresult == -1 || lowresult == -1){
        return -1;
      }
      return ((16 * highresult) + lowresult);
    }
    //Parse 4 byte values on position 5,6,8 and 9 in the buffer string
    if (receivelength == 10)
    {
      int tophighresult = HexToInt(receivebuffer[offset + 5]);
      int toplowresult = HexToInt(receivebuffer[offset + 6]);
      int highresult = HexToInt(receivebuffer[offset + 8]);
      int lowresult = HexToInt(receivebuffer[offset + 9]);
      if (tophighresult == -1 || toplowresult == -1 || highresult == -1 || lowresult == -1){
        return -1;
      }
      return ((4096 * tophighresult) + (256 * toplowresult) + (16 * highresult) + lowresult);
    }

    if (receivelength == 16)
    {
      int tophighresult = HexToInt(receivebuffer[offset + 5]);
      int toplowresult = HexToInt(receivebuffer[offset + 6]);
      int highresult = HexToInt(receivebuffer[offset + 8]);
      int lowresult = HexToInt(receivebuffer[offset + 9]);
      int tophighresult2 = HexToInt(receivebuffer[offset + 11]);
      int toplowresult2 = HexToInt(receivebuffer[offset + 12]);
      int highresult2 = HexToInt(receivebuffer[offset + 14]);
      int lowresult2 = HexToInt(receivebuffer[offset + 15]);

      if (tophighresult2 == -1 || toplowresult2 == -1 || highresult2 == -1 || lowresult2 == -1 || tophighresult == -1 || toplowresult == -1 || highresult == -1 || lowresult == -1){
        return -1;
      }
      return ((268435456 * tophighresult) + (16777216 * toplowresult) + (1048576 * highresult) + (65536 * lowresult) + (4096 * tophighresult2) + (256 * toplowresult2) + (16 * highresult2) + lowresult2);
    }

  }
  return -1; //Something is wrong with the returned OBD2 echo command byte
}

bool ReceiveAllValuesWithTimeout(int receivetrigger, int commandhighbyte, int commandlowbyte, int receivelength)
{
  int arduinoserialbuffer = 0;
  int buffercount = -1;
  for (int z = 0; z < 1500; z++) //500ms timeout should be enough
  {
    while (Serial.available())
    {
      if (buffercount == -1)
      {
        arduinoserialbuffer = Serial.read();
        if (arduinoserialbuffer != receivetrigger) //Wait until the trigger is reached, ignore echo, first character is not in the buffer
        {
          buffercount = -1;
        }
        else
        {
          buffercount = 0;
        }
      }
      else
      {
        arduinoserialbuffer = Serial.read();
        receivebuffer[buffercount] = arduinoserialbuffer;
        buffercount++;
        if (buffercount > receivelength) //buffer has now waitlen character length
        {
          return true;
          buffercount = -1;
        }
      }
    }
    delay(1);
  }
  return false;
}

void getAllData()
{
  ClearReceiveBuffer();
  Serial.write('0');
  Serial.write('1');
  Serial.write('E');
  Serial.write('F');
  Serial.write('\r');
  if (ReceiveAllValuesWithTimeout('4', 'E', 'F', 42))
  {
    rpm = ParseReceiveBufferOffset('E', 'F', 10, 0);
    speed = ParseReceiveBufferOffset('E', 'F', 10, 6);
    coolant = ParseReceiveBufferOffset('E', 'F', 7, 12);
    gear = ParseReceiveBufferOffset('E', 'F', 7, 15);
    position = ParseReceiveBufferOffset('E', 'F', 7, 18);
    currentlap = ParseReceiveBufferOffset('E', 'F', 7, 21);
    bestlaptime = ParseReceiveBufferOffset('E', 'F', 16, 24);
    fuel = ParseReceiveBufferOffset('E', 'F', 7, 36);
  }
}

void ClearReceiveBuffer()
{
  while (Serial.available())
  {
    Serial.read();
  }
}

void SendEchoDisabled() //not used here and a part of the OBD2 ELM327 specifications, as INFO
{
  //ATE0 Echo disabled
  Serial.write('A');
  Serial.write('T');
  Serial.write('E');
  Serial.write('0');
  Serial.write('\r');
}

//010c Request RPM, remember:  OBD2 RPM is ((A*256)+B)/4
int GetOBD2RpmValue()
{
  //010c
  ClearReceiveBuffer();
  Serial.write('0');
  Serial.write('1');
  Serial.write('0');
  Serial.write('c');
  Serial.write('\r');
  return ReceiveValueWithTimeout('4', '0', 'C', 10);
}

//010d Request speed in kmh
int GetOBD2SpeedValue()
{
  //010d
  ClearReceiveBuffer();
  Serial.write('0');
  Serial.write('1');
  Serial.write('0');
  Serial.write('d');
  Serial.write('\r');
  return ReceiveValueWithTimeout('4', '0', 'D', 7);
}

//01e0 Request gear number
int GetOBD2GearValue()
{
  //01e0
  ClearReceiveBuffer();
  Serial.write('0');
  Serial.write('1');
  Serial.write('e');
  Serial.write('0');
  Serial.write('\r');
  return ReceiveValueWithTimeout('4', 'E', '0', 7);
}

//01e1 Request current position
int GetOBD2PositionValue()
{
  //01e0
  ClearReceiveBuffer();
  Serial.write('0');
  Serial.write('1');
  Serial.write('e');
  Serial.write('1');
  Serial.write('\r');
  return ReceiveValueWithTimeout('4', 'E', '1', 7);
}

int GetOBD2SpeedValue_new()
{
  //01e0
  ClearReceiveBuffer();
  Serial.write('0');
  Serial.write('1');
  Serial.write('e');
  Serial.write('1');
  Serial.write('\r');
  return ReceiveValueWithTimeout('4', 'E', '1', 7);
}

int GetOBD2FuelValue()
{
  //01e0
  ClearReceiveBuffer();
  Serial.write('0');
  Serial.write('1');
  Serial.write('e');
  Serial.write('4');
  Serial.write('\r');
  return ReceiveValueWithTimeout('4', 'E', '4', 7);
}

//01e5 Request current joystick button status 0 to 7
int GetOBD2JoyStatus0to7()
{
  //01e5
  ClearReceiveBuffer();
  Serial.write('0');
  Serial.write('1');
  Serial.write('e');
  Serial.write('5');
  Serial.write('\r');
  return ReceiveValueWithTimeout('4', 'E', '5', 7);
}

void loop()
{
  //unsigned long currentMillis = millis();
  int          i;
  char*          neutral = "n";                // sets the character for neutral
  char*          reverse = "r";                // sets the character for reverse
  unsigned int    rpmleds; //holds the 8 leds values
  char          message[8];     // variable to display the message on the display
  int            fuel;
  int            joybutton;
  byte          button;
  String          output;
  int            dots = 40;
  int            hours;
  int            mins;
  int            secs;
  int            millisec;
  long         inttime;

  gear = GetOBD2GearValue();

  while (gear >= 0)
  {
    //unsigned long currentMillis = millis();
    if (extractordetected == false)
    {
      SendEchoDisabled();   //Will cause a OK\r as answer from the extractor, ignored in this code
      extractordetected = true;
    }

    getAllData();

    speed == speed;

    if (rpmmax < rpmlast)
      rpmmax = rpmlast + 100;


    if (gear==0){
      sprintf(message,"%s:%s",rapport, reverse);
      lcd.setCursor(06, 1);
      lcd.write(2);
      lcd.write(8);
      rpmleds = map(rpm, 0, rpmmax, 0, 20);
      if (rpmleds >= 19) {
        delay(100);
        lcd.clear();
      }
    }


    if (gear==1){
      sprintf(marcha,neutral);//escreve a marcha ponto morto
      lcd.setCursor(06, 1);
      lcd.write(2);
      lcd.write(8);
      lcd.write(1);

      delay(100);
      lcd.clear();


    }
    if (gear==2){
      sprintf(message,"%s:%d",rapport, gear-1);
      lcd.setCursor(5,0);
      lcd.write(32);
      lcd.write(32);
      lcd.write(1);
      lcd.setCursor(5,1);
      lcd.write(32);
      lcd.write(32);
      lcd.write(1);
      rpmleds = map(rpm, 0, rpmmax, 0, 20);
      if (rpmleds >= 19) {
        delay(100);
        lcd.clear();
      }


    }
    if (gear==3){
      sprintf(message,"%s:%d",rapport, gear-1);
      lcd.setCursor(6,0);
      lcd.write(5);
      lcd.write(3);
      lcd.write(1);
      lcd.setCursor(6, 1);
      lcd.write(2);
      lcd.write(6);
      lcd.write(6);
      rpmleds = map(rpm, 0, rpmmax, 0, 20);
      if (rpmleds >= 19) {
        delay(100);
        lcd.clear();
      }
    }


    if (gear==4){
      sprintf(message,"%s:%d",rapport, gear-1);
      lcd.setCursor(6,0);
      lcd.write(5);
      lcd.write(3);
      lcd.write(1);
      lcd.setCursor(6, 1);
      lcd.write(7);
      lcd.write(6);
      lcd.write(1);
      rpmleds = map(rpm, 0, rpmmax, 0, 20);
      if (rpmleds >= 19) {
        delay(100);
        lcd.clear();
      }
    }


    if (gear==5){
      sprintf(message,"%s:%d",rapport, gear-1);
      lcd.setCursor(6,0);
      lcd.write(2);
      lcd.write(6);
      lcd.write(1);
      lcd.setCursor(6, 1);
      lcd.write(32);
      lcd.write(32);
      lcd.write(1);
      rpmleds = map(rpm, 0, rpmmax, 0, 20);
      if (rpmleds >= 19) {
        delay(100);
        lcd.clear();
      }


    }
    if (gear==6){
      sprintf(message,"%s:%d",rapport, gear-1);
      lcd.setCursor(6,0);
      lcd.write(2);
      lcd.write(3);
      lcd.write(4);
      lcd.setCursor(6, 1);
      lcd.write(7);
      lcd.write(6);
      lcd.write(1);
      rpmleds = map(rpm, 0, rpmmax, 0, 20);
      if (rpmleds >= 19) {
        delay(100);
        lcd.clear();
      }


    }
    if (gear==7){
      sprintf(message,"%s:%d",rapport, gear-1);
      lcd.setCursor(6,0);
      lcd.write(2);
      lcd.write(3);
      lcd.write(4);
      lcd.setCursor(6, 1);
      lcd.write(2);
      lcd.write(6);
      lcd.write(1);
      rpmleds = map(rpm, 0, rpmmax, 0, 20);
      if (rpmleds >= 19) {
        delay(100);
        lcd.clear();
      }


    }
    if (gear==8){
      sprintf(message,"%s:%d",rapport, gear-1);
      lcd.setCursor(6,0);
      lcd.write(2);
      lcd.write(8);
      lcd.write(1);
      lcd.setCursor(6, 1);
      lcd.write(32);
      lcd.write(32);
      lcd.write(1);
      rpmleds = map(rpm, 0, rpmmax, 0, 20);
      if (rpmleds >= 19) {
        delay(100);
        lcd.clear();
      }


    }
    if (gear==9){
      sprintf(message,"%s:%d",rapport, gear-1);
      lcd.setCursor(6, 0);
      lcd.write(2);
      lcd.write(3);
      lcd.write(1);
      lcd.setCursor(6, 1);
      lcd.write(2);
      lcd.write(6);
      lcd.write(1);
      rpmleds = map(rpm, 0, rpmmax, 0, 20);
      if (rpmleds >= 19) {
        delay(100);
        lcd.clear();
      }


    }
    if (gear==10){
      sprintf(message,"%s:%d",rapport, gear-1);
      lcd.setCursor(6, 0);
      lcd.write(2);
      lcd.write(3);
      lcd.write(1);
      lcd.setCursor(6, 1);
      lcd.write(7);
      lcd.write(6);
      lcd.write(1);
      rpmleds = map(rpm, 0, rpmmax, 0, 20);
      if (rpmleds >= 19) {
        delay(100);
        lcd.clear();
      }


    }
    if (gear==11){
      sprintf(message,"%s:%d",rapport, gear-1);
      lcd.setCursor(4,0);
      lcd.write(32);
      lcd.write(32);
      lcd.write(1);
      lcd.setCursor(4,1);
      lcd.write(32);
      lcd.write(32);
      lcd.write(1);
      lcd.setCursor(7,0);
      lcd.write(2);
      lcd.write(8);
      lcd.write(1);
      lcd.setCursor(7,1);
      lcd.write(2);
      lcd.write(6);
      lcd.write(1);
      rpmleds = map(rpm, 0, rpmmax, 0, 20);
      if (rpmleds >= 19) {
        delay(100);
        lcd.clear();
      }


    }
    if (gear==12){
      sprintf(message,"%s:%d",rapport, gear-1);
      lcd.setCursor(4,0);
      lcd.write(32);
      lcd.write(32);
      lcd.write(1);
      lcd.setCursor(4,1);
      lcd.write(32);
      lcd.write(32);
      lcd.write(1);
      lcd.setCursor(7,0);
      lcd.write(32);
      lcd.write(32);
      lcd.write(1);
      lcd.setCursor(7,1);
      lcd.write(32);
      lcd.write(32);
      lcd.write(1);
      rpmleds = map(rpm, 0, rpmmax, 0, 20);
      if (rpmleds >= 19) {
        delay(100);
        lcd.clear();
      }


    }
    if (gear==13){
      sprintf(message,"%s:%d",rapport, gear-1);
      lcd.setCursor(4,0);
      lcd.write(32);
      lcd.write(32);
      lcd.write(1);
      lcd.setCursor(4,1);
      lcd.write(32);
      lcd.write(32);
      lcd.write(1);
      lcd.setCursor(7,0);
      lcd.write(5);
      lcd.write(3);
      lcd.write(1);
      lcd.setCursor(7,1);
      lcd.write(2);
      lcd.write(6);
      lcd.write(6);
      rpmleds = map(rpm, 0, rpmmax, 0, 20);
      if (rpmleds >= 19) {
        delay(100);
        lcd.clear();
      }

    }
    sprintf(message,"%s",trmin);
    lcd.setCursor(11,0);
    lcd.write(message);
    sprintf(message,"%5d",rpm);
    lcd.setCursor(11,1);
    lcd.write(message);
    sprintf(message,"%s",speed1);
    lcd.setCursor(0,0);
    lcd.write(message);

    if (speed > 0){
      c = speed*3.595;
      sprintf(message,"%3d",c);
      lcd.setCursor(1,1);
      lcd.write(message);
    }
    delay(1);


    rpmlast = rpm;


  }
  extractordetected = false;
  digitalWrite(13, HIGH); //No connection, turn off the LED
  lcd.setCursor(0,0);
  lcd.write("[<-OPEN X-SIM->]");
  lcd.setCursor(0,1);
  lcd.write("  EURO TRUCK 2");
  delay(2000); //No serial connection, poll serial port all two seconds + readtimeout until a running extractor is detected
  lcd.clear();
}
- bahzitchiu
- Posts: 9
- Joined: Wed 18. Jun 2014, 05:33
- Has thanked: 0 time
- Been thanked: 8 times
Re: LCD DashBoard
![]() by wpessi » Fri 25. Mar 2016, 04:08
by wpessi » Fri 25. Mar 2016, 04:08
Iniciativa legal! Desculpe "cavar" esse tópico, mas conseguiu algum progresso? Obrigado.
- wpessi
- Posts: 2
- Joined: Fri 25. Mar 2016, 03:19
- Has thanked: 0 time
- Been thanked: 0 time
Re: LCD DashBoard
![]() by bahzitchiu » Sat 4. Jun 2016, 19:38
by bahzitchiu » Sat 4. Jun 2016, 19:38
wpessi wrote:Iniciativa legal! Desculpe "cavar" esse tópico, mas conseguiu algum progresso? Obrigado.
Estou usando um tm1638 q peguei na China, essa aqui foi minha fonte de inspiração, juntamente com o LCD 16x2, ficou mais ou menos assim:
[album]http://www.siminstruments.com/images/wheel%20mount%20on%20Dash%20medium.png[/album]
[YouTube]https://www.youtube.com/watch?v=s2H4GxoGXm4[/YouTube]
[ ]´s
- bahzitchiu
- Posts: 9
- Joined: Wed 18. Jun 2014, 05:33
- Has thanked: 0 time
- Been thanked: 8 times
Re: LCD DashBoard
![]() by leitegui » Sun 5. Jun 2016, 19:30
by leitegui » Sun 5. Jun 2016, 19:30
bahzitchiu wrote:Oq fiz:
Andei postando minhas experiências em outro tópico, mas como ali tá meio "morto" quem sabe aqui o negócio anda para frente. Consegui fazer funcionar no rfactor, rfactor 2, game stock car extreme, formula truck 2013, assetto corsa e euro truck simulator 2.
No assetto corsa e no euro truck só consigo "pegar" rpm, velocidade e marchas (usando OBD II). Nos outros games, além desses itens pego posição, numero da volta, melhor volta. No assetto corsa consigo pegar o tempo total da corrida, mas não a best lap nem o tempo de volta hahahaha. Combustível não consegui fazer funcionar,(ainda). To tentando implementar um código meio "universal" já q esse display 16x2 é bem barato, mais para frente planejo pegar um de oled pq tem o refresh rate maior, ilumina mais e não tem necessidade de backlight.
Segue meus códigos ai:
- Code: Select all
//  X-Sim Sample code for receiving OBD2 values from the extractor without using the converter
//  OBD2 is industry standard, X-Sim will additionally expand the OBD2 PID with gear and other values
//
//  Usage:
//  Arduino has to be connected to a free USB port on the computer where the extractor is running
//  Open the extractor and open the settings menu, there you have to select the OBD2 menu
//  Add now your arduino comport to the OBD2 list.
//  After closing the dialog you will see the arduino LED will be enabled which represents receiving data.
//  After closing the extractor application the LED will switch off.
//  Use this code to insert your own display code at the fitting positions
//  Copyright 2013 Martin Wiedenbauer, X-Sim.de
//  New procedures ideias by bahzitchiu
//  Share for free
//  References:
//  http://en.wikipedia.org/wiki/OBD-II_PIDs
//  http://elmelectronics.com/DSheets/ELM327DS.pdf
//  http://www.x-sim.de

#include <LiquidCrystal.h>
LiquidCrystal lcd(12,11,5,4,3,2);
char gas[6] = "F";
char lugar[8] = "P";
char lap[7] = "L";
char rapport[5] = "Gear";
char trmin[5] = "RPM";
char speed1[8] = "SPEED";
char speedunit[5] = "KM/H";
char marcha[16] = "";
char message[16] = "";
unsigned int rpmmax = 100;
unsigned int rpmlast;
int setrpm = 0;
int mode = 1;
int rpm, speed, gear, position, currentlap, lapp, c,d;
long bestlaptime,lastlaptime,laptime,delta,time,alfa;
bool extractordetected=false;
int receivebuffer[100]={
  0};
byte bar1[8] =
{
  B11100,
  B11110,
  B11110,
  B11110,
  B11110,
  B11110,
  B11110,
  B11100
};
byte bar2[8] =
{
  B00111,
  B01111,
  B01111,
  B01111,
  B01111,
  B01111,
  B01111,
  B00111
};
byte bar3[8] =
{
  B11111,
  B11111,
  B00000,
  B00000,
  B00000,
  B00000,
  B11111,
  B11111
};
byte bar4[8] =
{
  B11110,
  B11100,
  B00000,
  B00000,
  B00000,
  B00000,
  B11000,
  B11100
};
byte bar5[8] =
{
  B01111,
  B00111,
  B00000,
  B00000,
  B00000,
  B00000,
  B00111,
  B01111
};
byte bar6[8] =
{
  B00000,
  B00000,
  B00000,
  B00000,
  B00000,
  B00000,
  B11111,
  B11111
};
byte bar7[8] =
{
  B00000,
  B00000,
  B00000,
  B00000,
  B00000,
  B00000,
  B00111,
  B01111
};
byte bar8[8] =
{
  B11111,
  B11111,
  B00000,
  B00000,
  B00000,
  B00000,
  B00000,
  B00000
};

void setup()

{
  lcd.createChar(1,bar1);
  lcd.createChar(2,bar2);
  lcd.createChar(3,bar3);
  lcd.createChar(4,bar4);
  lcd.createChar(5,bar5);
  lcd.createChar(6,bar6);
  lcd.createChar(7,bar7);
  lcd.createChar(8,bar8);

  lcd.begin(16, 2);
  pinMode(13, OUTPUT);
  digitalWrite(13, HIGH);
  Serial.begin(9600);
  lcd.begin(16, 2);
  lcd.print("   X-SIM DASH");
  delay(3000);
  lcd.clear();
}

int HexToInt(int c)
{
  if (c >= '0' && c <= '9')
  {
    return c - '0';
  }
  else if (c >= 'a' && c <= 'f')
  {
    return c - 'a' + 10;
  }
  else if (c >= 'A' && c <= 'F')
  {
    return c - 'A' + 10;
  }
  else
  {
    return -1;
  }
}


int ReceiveValueWithTimeout(int receivetrigger, int commandhighbyte, int commandlowbyte, int receivelength)
{
  int arduinoserialbuffer = 0;
  int buffercount = -1;
  for (int z = 0; z < 1500; z++)
  {
    while (Serial.available())
    {
      if (buffercount == -1)
      {
        arduinoserialbuffer = Serial.read();
        if (arduinoserialbuffer != receivetrigger)
        {
          buffercount = -1;
        }
        else
        {
          buffercount = 0;
        }
      }
      else
      {
        arduinoserialbuffer = Serial.read();
        receivebuffer[buffercount] = arduinoserialbuffer;
        buffercount++;
        if (buffercount > receivelength)
        {
          return ParseReceiveBufferOffset(commandhighbyte, commandlowbyte, receivelength, 0);
          buffercount = -1;
        }
      }
    }
    delay(1);
  }
  return -1;
}

long ParseReceiveBufferOffset(int commandhighbyte, int commandlowbyte, int receivelength, int offset)
{

  if (receivebuffer[0] == '1' && receivebuffer[2] == commandhighbyte && receivebuffer[3] == commandlowbyte)
  {

    if (receivelength == 7)
    {
      int highresult = HexToInt(receivebuffer[offset + 5]);
      int lowresult = HexToInt(receivebuffer[offset + 6]);
      if (highresult == -1 || lowresult == -1){
        return -1;
      }
      return ((16 * highresult) + lowresult);
    }

    if (receivelength == 10)
    {
      int tophighresult = HexToInt(receivebuffer[offset + 5]);
      int toplowresult = HexToInt(receivebuffer[offset + 6]);
      int highresult = HexToInt(receivebuffer[offset + 8]);
      int lowresult = HexToInt(receivebuffer[offset + 9]);
      if (tophighresult == -1 || toplowresult == -1 || highresult == -1 || lowresult == -1){
        return -1;
      }
      return ((4096 * tophighresult) + (256 * toplowresult) + (16 * highresult) + lowresult);
    }

    if (receivelength == 16)
    {
      int tophighresult = HexToInt(receivebuffer[offset + 5]);
      int toplowresult = HexToInt(receivebuffer[offset + 6]);
      int highresult = HexToInt(receivebuffer[offset + 8]);
      int lowresult = HexToInt(receivebuffer[offset + 9]);
      int tophighresult2 = HexToInt(receivebuffer[offset + 11]);
      int toplowresult2 = HexToInt(receivebuffer[offset + 12]);
      int highresult2 = HexToInt(receivebuffer[offset + 14]);
      int lowresult2 = HexToInt(receivebuffer[offset + 15]);

      if (tophighresult2 == -1 || toplowresult2 == -1 || highresult2 == -1 || lowresult2 == -1 || tophighresult == -1 || toplowresult == -1 || highresult == -1 || lowresult == -1){
        return -1;
      }
      return ((268435456 * tophighresult) + (16777216 * toplowresult) + (1048576 * highresult) + (65536 * lowresult) + (4096 * tophighresult2) + (256 * toplowresult2) + (16 * highresult2) + lowresult2);
    }

  }
  return -1;
}

bool ReceiveAllValuesWithTimeout(int receivetrigger, int commandhighbyte, int commandlowbyte, int receivelength)
{
  int arduinoserialbuffer = 0;
  int buffercount = -1;
  for (int z = 0; z < 1500; z++)
  {
    while (Serial.available())
    {
      if (buffercount == -1)
      {
        arduinoserialbuffer = Serial.read();
        if (arduinoserialbuffer != receivetrigger)
        {
          buffercount = -1;
        }
        else
        {
          buffercount = 0;
        }
      }
      else
      {
        arduinoserialbuffer = Serial.read();
        receivebuffer[buffercount] = arduinoserialbuffer;
        buffercount++;
        if (buffercount > receivelength)
        {
          return true;
          buffercount = -1;
        }
      }
    }
    delay(1);
  }
  return false;
}

void getAllData()
{
  ClearReceiveBuffer();
  Serial.write('0');
  Serial.write('1');
  Serial.write('E');
  Serial.write('F');
  Serial.write('\r');
  if (ReceiveAllValuesWithTimeout('4', 'E', 'F', 42))
  {
    rpm = ParseReceiveBufferOffset('E', 'F', 10, 0);
    speed = ParseReceiveBufferOffset('E', 'F', 10, 6);
    gear = ParseReceiveBufferOffset('E', 'F', 7, 15);
    position = ParseReceiveBufferOffset('E', 'F', 7, 18);
    currentlap = ParseReceiveBufferOffset('E', 'F', 7, 21);
    bestlaptime = ParseReceiveBufferOffset('E', 'F', 16, 24);
  }
}

void ClearReceiveBuffer()
{
  while (Serial.available())
  {
    Serial.read();
  }
}

void SendEchoDisabled()
{

  Serial.write('A');
  Serial.write('T');
  Serial.write('E');
  Serial.write('0');
  Serial.write('\r');
}


int GetOBD2RpmValue()
{

  ClearReceiveBuffer();
  Serial.write('0');
  Serial.write('1');
  Serial.write('0');
  Serial.write('c');
  Serial.write('\r');
  return ReceiveValueWithTimeout('4', '0', 'C', 10);
}


int GetOBD2SpeedValue()
{

  ClearReceiveBuffer();
  Serial.write('0');
  Serial.write('1');
  Serial.write('0');
  Serial.write('d');
  Serial.write('\r');
  return ReceiveValueWithTimeout('4', '0', 'D', 7);
}


int GetOBD2GearValue()
{

  ClearReceiveBuffer();
  Serial.write('0');
  Serial.write('1');
  Serial.write('e');
  Serial.write('0');
  Serial.write('\r');
  return ReceiveValueWithTimeout('4', 'E', '0', 7);
}


int GetOBD2PositionValue()
{

  ClearReceiveBuffer();
  Serial.write('0');
  Serial.write('1');
  Serial.write('e');
  Serial.write('1');
  Serial.write('\r');
  return ReceiveValueWithTimeout('4', 'E', '1', 7);
}

int GetOBD2SpeedValue_new()
{

  ClearReceiveBuffer();
  Serial.write('0');
  Serial.write('1');
  Serial.write('e');
  Serial.write('1');
  Serial.write('\r');
  return ReceiveValueWithTimeout('4', 'E', '1', 7);
}

void loop()
{

  int          i;
  char*          neutral = "n";
  char*          reverse = "r";
  unsigned int    rpmleds;
  char          message[8];
  String          output;
  int            hours;
  int            mins;
  int            secs;
  int            millisec;
  long         inttime;

  gear = GetOBD2GearValue();
  c=0;
  d=0;
  while (gear >= 0)
  {

    if (extractordetected == false)
    {
      SendEchoDisabled();
      extractordetected = true;
    }

    getAllData();
    lapp=currentlap;


    if (rpmmax < rpmlast)
      rpmmax = rpmlast + 100;


    if (gear==0){

      sprintf(message,"%s:%s",rapport, reverse);
      lcd.setCursor(4, 1);
      lcd.write(2);
      lcd.write(8);
      rpmleds = map(rpm, 0, rpmmax, 0, 20);
      if (rpmleds >= 19) {
        delay(100);
        lcd.clear();
      }

    }


    if (gear==1){
      sprintf(marcha,neutral);
      lcd.setCursor(4, 1);
      lcd.write(2);
      lcd.write(8);
      lcd.write(1);
      rpmleds = map(rpm, 0, rpmmax, 0, 20);
      if (rpmleds >= 19) {
        delay(100);
        lcd.clear();
      }
    }


    if (gear==2){
      sprintf(message,"%s:%d",rapport, gear-1);
      lcd.setCursor(4,0);
      lcd.write(32);
      lcd.write(32);
      lcd.write(1);
      lcd.setCursor(4,1);
      lcd.write(32);
      lcd.write(32);
      lcd.write(1);
      rpmleds = map(rpm, 0, rpmmax, 0, 20);
      if (rpmleds >= 19) {
        delay(100);
        lcd.clear();
      }
    }


    if (gear==3){
      sprintf(message,"%s:%d",rapport, gear-1);
      lcd.setCursor(4,0);
      lcd.write(5);
      lcd.write(3);
      lcd.write(1);
      lcd.setCursor(4, 1);
      lcd.write(2);
      lcd.write(6);
      lcd.write(6);
      rpmleds = map(rpm, 0, rpmmax, 0, 20);
      if (rpmleds >= 19) {
        delay(100);
        lcd.clear();
      }
    }


    if (gear==4){
      sprintf(message,"%s:%d",rapport, gear-1);
      lcd.setCursor(4,0);
      lcd.write(5);
      lcd.write(3);
      lcd.write(1);
      lcd.setCursor(4, 1);
      lcd.write(7);
      lcd.write(6);
      lcd.write(1);
      rpmleds = map(rpm, 0, rpmmax, 0, 20);
      if (rpmleds >= 19) {
        delay(100);
        lcd.clear();
      }
    }


    if (gear==5){
      sprintf(message,"%s:%d",rapport, gear-1);
      lcd.setCursor(4,0);
      lcd.write(2);
      lcd.write(6);
      lcd.write(1);
      lcd.setCursor(4, 1);
      lcd.write(32);
      lcd.write(32);
      lcd.write(1);
      rpmleds = map(rpm, 0, rpmmax, 0, 20);
      if (rpmleds >= 19) {
        delay(100);
        lcd.clear();
      }
    }


    if (gear==6){
      sprintf(message,"%s:%d",rapport, gear-1);
      lcd.setCursor(4,0);
      lcd.write(2);
      lcd.write(3);
      lcd.write(4);
      lcd.setCursor(4, 1);
      lcd.write(7);
      lcd.write(6);
      lcd.write(1);
      rpmleds = map(rpm, 0, rpmmax, 0, 20);
      if (rpmleds >= 19) {
        delay(100);
        lcd.clear();
      }

    }


    if (gear==7){
      sprintf(message,"%s:%d",rapport, gear-1);
      lcd.setCursor(4,0);
      lcd.write(2);
      lcd.write(3);
      lcd.write(4);
      lcd.setCursor(4, 1);
      lcd.write(2);
      lcd.write(6);
      lcd.write(1);
      rpmleds = map(rpm, 0, rpmmax, 0, 20);
      if (rpmleds >= 19) {
        delay(100);
        lcd.clear();
      }

    }


    if (gear==8){
      sprintf(message,"%s:%d",rapport, gear-1);
      lcd.setCursor(4,0);
      lcd.write(2);
      lcd.write(8);
      lcd.write(1);
      lcd.setCursor(4, 1);
      lcd.write(32);
      lcd.write(32);
      lcd.write(1);
      rpmleds = map(rpm, 0, rpmmax, 0, 20);
      if (rpmleds >= 19) {
        delay(100);
        lcd.clear();
      }

    }


    if (gear==9){
      sprintf(message,"%s:%d",rapport, gear-1);
      lcd.setCursor(4, 0);
      lcd.write(2);
      lcd.write(3);
      lcd.write(1);
      lcd.setCursor(4, 1);
      lcd.write(2);
      lcd.write(6);
      lcd.write(1);
      rpmleds = map(rpm, 0, rpmmax, 0, 20);
      if (rpmleds >= 19) {
        delay(100);
        lcd.clear();
      }

    }


    if (gear==10){
      sprintf(message,"%s:%d",rapport, gear-1);
      lcd.setCursor(4, 0);
      lcd.write(2);
      lcd.write(3);
      lcd.write(1);
      lcd.setCursor(4, 1);
      lcd.write(7);
      lcd.write(6);
      lcd.write(1);
      rpmleds = map(rpm, 0, rpmmax, 0, 20);
      if (rpmleds >= 19) {
        delay(100);
        lcd.clear();
      }
    }

    {
      sprintf(message,"P%02d",position);
      lcd.setCursor(13,0);
      lcd.write(message);
      sprintf(message,"%3d",speed);
      lcd.setCursor(0,2);
      lcd.write(message);
      sprintf(message,"L%02d", currentlap);
      lcd.setCursor(0,0);
      lcd.write(message);

      if (bestlaptime < lastlaptime){
        sprintf(message, "BEST");
        lcd.setCursor(8,0);
        lcd.write(message);
      }
      else{
        sprintf(message, "    ");
        lcd.setCursor(8,0);
        lcd.write(message);
      }


      if (bestlaptime == -1)
      {
        sprintf(message, "000000");
      }
      else
      {
        inttime = bestlaptime / 1000;
        millisec = bestlaptime % 1000;
        hours = inttime / 3600;
        inttime = inttime % 3600;
        mins = inttime / 60;
        inttime = inttime % 60;
        secs = inttime;
        sprintf(message, "%1d:%02d.%003d", mins, secs, millisec);
        lcd.setCursor(8,1);
        lcd.write(message);
        lastlaptime=bestlaptime;
      }
      rpmlast = rpm;
    }
  }
  extractordetected = false;
  digitalWrite(13, HIGH);
  lcd.setCursor(0,0);
  lcd.write("[<-OPEN X-SIM->]");
  lcd.setCursor(0,2);
  lcd.write(" GAME STOCK CAR");
  delay(2000);
  lcd.clear();
}
PS: Esse código é para game stock car extreme, rfactor 2, assetto corsa.
PS2: para arrumar o "gear" no assetto corsa mude "gear == x" to "gear == x+1";
Código para euro truck 2 com 12 marchas
- Code: Select all
//  X-Sim Sample code for receiving OBD2 values from the extractor without using the converter
//  OBD2 is industry standard, X-Sim will additionally expand the OBD2 PID with gear and other values
//
//  Usage:
//  Arduino has to be connected to a free USB port on the computer where the extractor is running
//  Open the extractor and open the settings menu, there you have to select the OBD2 menu
//  Add now your arduino comport to the OBD2 list.
//  After closing the dialog you will see the arduino LED will be enabled which represents receiving data.
//  After closing the extractor application the LED will switch off.
//  Use this code to insert your own display code at the fitting positions
//  Copyright 2013 Martin Wiedenbauer, X-Sim.de
//
//  References:
//  http://en.wikipedia.org/wiki/OBD-II_PIDs
//  http://elmelectronics.com/DSheets/ELM327DS.pdf
//  http://www.x-sim.de

#include <LiquidCrystal.h>
LiquidCrystal lcd(12,11,5,4,3,2);

char rapport[5] = "Gear";
char trmin[5] = "RPM";
char speed1[8] = "SPEED";
char speedunit[5] = "KM/H";
char marcha[16] = "";
char message[16] = "";
unsigned int rpmmax = 100;
unsigned int rpmlast;
int setrpm = 0;
int mode = 1;
int rpm, speed, coolant, gear, position, currentlap, fuel,c;
long bestlaptime;
bool extractordetected=false;
int receivebuffer[100]={
  0};


byte bar1[8] =
{
  B11100,
  B11110,
  B11110,
  B11110,
  B11110,
  B11110,
  B11110,
  B11100
};
byte bar2[8] =
{
  B00111,
  B01111,
  B01111,
  B01111,
  B01111,
  B01111,
  B01111,
  B00111
};
byte bar3[8] =
{
  B11111,
  B11111,
  B00000,
  B00000,
  B00000,
  B00000,
  B11111,
  B11111
};
byte bar4[8] =
{
  B11110,
  B11100,
  B00000,
  B00000,
  B00000,
  B00000,
  B11000,
  B11100
};
byte bar5[8] =
{
  B01111,
  B00111,
  B00000,
  B00000,
  B00000,
  B00000,
  B00111,
  B01111
};
byte bar6[8] =
{
  B00000,
  B00000,
  B00000,
  B00000,
  B00000,
  B00000,
  B11111,
  B11111
};
byte bar7[8] =
{
  B00000,
  B00000,
  B00000,
  B00000,
  B00000,
  B00000,
  B00111,
  B01111
};
byte bar8[8] =
{
  B11111,
  B11111,
  B00000,
  B00000,
  B00000,
  B00000,
  B00000,
  B00000
};


void setup()

{
  // assignes each segment a write number
  lcd.createChar(1,bar1);
  lcd.createChar(2,bar2);
  lcd.createChar(3,bar3);
  lcd.createChar(4,bar4);
  lcd.createChar(5,bar5);
  lcd.createChar(6,bar6);
  lcd.createChar(7,bar7);
  lcd.createChar(8,bar8);

  // sets the LCD's rows and colums:
  lcd.begin(16, 2);
  pinMode(13, OUTPUT); //Arduino UNO LED off
  digitalWrite(13, HIGH);
  Serial.begin(9600);//9600
  //Do here stuff to init display and zero to default
  lcd.begin(16, 2);
  lcd.print("   X-SIM DASH");
  delay(3000);
  lcd.clear();
}

int HexToInt(int c)
{
  if (c >= '0' && c <= '9')
  {
    return c - '0';
  }
  else if (c >= 'a' && c <= 'f')
  {
    return c - 'a' + 10;
  }
  else if (c >= 'A' && c <= 'F')
  {
    return c - 'A' + 10;
  }
  else
  {
    return -1; // getting here is bad: it means the character was invalid
  }
}

//This function will wait for the first character in receivetrigger and will parse the result
int ReceiveValueWithTimeout(int receivetrigger, int commandhighbyte, int commandlowbyte, int receivelength)
{
  int arduinoserialbuffer = 0;
  int buffercount = -1;
  for (int z = 0; z < 1500; z++) //500ms timeout should be enough
  {
    while (Serial.available())
    {
      if (buffercount == -1)
      {
        arduinoserialbuffer = Serial.read();
        if (arduinoserialbuffer != receivetrigger) //Wait until the trigger is reached, ignore echo, first character is not in the buffer
        {
          buffercount = -1;
        }
        else
        {
          buffercount = 0;
        }
      }
      else
      {
        arduinoserialbuffer = Serial.read();
        receivebuffer[buffercount] = arduinoserialbuffer;
        buffercount++;
        if (buffercount > receivelength) //buffer has now waitlen character length
        {
          return ParseReceiveBufferOffset(commandhighbyte, commandlowbyte, receivelength, 0);
          buffercount = -1;
        }
      }
    }
    delay(1);
  }
  return -1;
}

long ParseReceiveBufferOffset(int commandhighbyte, int commandlowbyte, int receivelength, int offset)
{
  //First character is removed of the receivebuffer string and must not be verified again
  if (receivebuffer[0] == '1' && receivebuffer[2] == commandhighbyte && receivebuffer[3] == commandlowbyte)
  {
    //Parse 2 byte values on position 5 and 6 in the buffer string
    if (receivelength == 7)
    {
      int highresult = HexToInt(receivebuffer[offset + 5]);
      int lowresult = HexToInt(receivebuffer[offset + 6]);
      if (highresult == -1 || lowresult == -1){
        return -1;
      }
      return ((16 * highresult) + lowresult);
    }
    //Parse 4 byte values on position 5,6,8 and 9 in the buffer string
    if (receivelength == 10)
    {
      int tophighresult = HexToInt(receivebuffer[offset + 5]);
      int toplowresult = HexToInt(receivebuffer[offset + 6]);
      int highresult = HexToInt(receivebuffer[offset + 8]);
      int lowresult = HexToInt(receivebuffer[offset + 9]);
      if (tophighresult == -1 || toplowresult == -1 || highresult == -1 || lowresult == -1){
        return -1;
      }
      return ((4096 * tophighresult) + (256 * toplowresult) + (16 * highresult) + lowresult);
    }

    if (receivelength == 16)
    {
      int tophighresult = HexToInt(receivebuffer[offset + 5]);
      int toplowresult = HexToInt(receivebuffer[offset + 6]);
      int highresult = HexToInt(receivebuffer[offset + 8]);
      int lowresult = HexToInt(receivebuffer[offset + 9]);
      int tophighresult2 = HexToInt(receivebuffer[offset + 11]);
      int toplowresult2 = HexToInt(receivebuffer[offset + 12]);
      int highresult2 = HexToInt(receivebuffer[offset + 14]);
      int lowresult2 = HexToInt(receivebuffer[offset + 15]);

      if (tophighresult2 == -1 || toplowresult2 == -1 || highresult2 == -1 || lowresult2 == -1 || tophighresult == -1 || toplowresult == -1 || highresult == -1 || lowresult == -1){
        return -1;
      }
      return ((268435456 * tophighresult) + (16777216 * toplowresult) + (1048576 * highresult) + (65536 * lowresult) + (4096 * tophighresult2) + (256 * toplowresult2) + (16 * highresult2) + lowresult2);
    }

  }
  return -1; //Something is wrong with the returned OBD2 echo command byte
}

bool ReceiveAllValuesWithTimeout(int receivetrigger, int commandhighbyte, int commandlowbyte, int receivelength)
{
  int arduinoserialbuffer = 0;
  int buffercount = -1;
  for (int z = 0; z < 1500; z++) //500ms timeout should be enough
  {
    while (Serial.available())
    {
      if (buffercount == -1)
      {
        arduinoserialbuffer = Serial.read();
        if (arduinoserialbuffer != receivetrigger) //Wait until the trigger is reached, ignore echo, first character is not in the buffer
        {
          buffercount = -1;
        }
        else
        {
          buffercount = 0;
        }
      }
      else
      {
        arduinoserialbuffer = Serial.read();
        receivebuffer[buffercount] = arduinoserialbuffer;
        buffercount++;
        if (buffercount > receivelength) //buffer has now waitlen character length
        {
          return true;
          buffercount = -1;
        }
      }
    }
    delay(1);
  }
  return false;
}

void getAllData()
{
  ClearReceiveBuffer();
  Serial.write('0');
  Serial.write('1');
  Serial.write('E');
  Serial.write('F');
  Serial.write('\r');
  if (ReceiveAllValuesWithTimeout('4', 'E', 'F', 42))
  {
    rpm = ParseReceiveBufferOffset('E', 'F', 10, 0);
    speed = ParseReceiveBufferOffset('E', 'F', 10, 6);
    coolant = ParseReceiveBufferOffset('E', 'F', 7, 12);
    gear = ParseReceiveBufferOffset('E', 'F', 7, 15);
    position = ParseReceiveBufferOffset('E', 'F', 7, 18);
    currentlap = ParseReceiveBufferOffset('E', 'F', 7, 21);
    bestlaptime = ParseReceiveBufferOffset('E', 'F', 16, 24);
    fuel = ParseReceiveBufferOffset('E', 'F', 7, 36);
  }
}

void ClearReceiveBuffer()
{
  while (Serial.available())
  {
    Serial.read();
  }
}

void SendEchoDisabled() //not used here and a part of the OBD2 ELM327 specifications, as INFO
{
  //ATE0 Echo disabled
  Serial.write('A');
  Serial.write('T');
  Serial.write('E');
  Serial.write('0');
  Serial.write('\r');
}

//010c Request RPM, remember:  OBD2 RPM is ((A*256)+B)/4
int GetOBD2RpmValue()
{
  //010c
  ClearReceiveBuffer();
  Serial.write('0');
  Serial.write('1');
  Serial.write('0');
  Serial.write('c');
  Serial.write('\r');
  return ReceiveValueWithTimeout('4', '0', 'C', 10);
}

//010d Request speed in kmh
int GetOBD2SpeedValue()
{
  //010d
  ClearReceiveBuffer();
  Serial.write('0');
  Serial.write('1');
  Serial.write('0');
  Serial.write('d');
  Serial.write('\r');
  return ReceiveValueWithTimeout('4', '0', 'D', 7);
}

//01e0 Request gear number
int GetOBD2GearValue()
{
  //01e0
  ClearReceiveBuffer();
  Serial.write('0');
  Serial.write('1');
  Serial.write('e');
  Serial.write('0');
  Serial.write('\r');
  return ReceiveValueWithTimeout('4', 'E', '0', 7);
}

//01e1 Request current position
int GetOBD2PositionValue()
{
  //01e0
  ClearReceiveBuffer();
  Serial.write('0');
  Serial.write('1');
  Serial.write('e');
  Serial.write('1');
  Serial.write('\r');
  return ReceiveValueWithTimeout('4', 'E', '1', 7);
}

int GetOBD2SpeedValue_new()
{
  //01e0
  ClearReceiveBuffer();
  Serial.write('0');
  Serial.write('1');
  Serial.write('e');
  Serial.write('1');
  Serial.write('\r');
  return ReceiveValueWithTimeout('4', 'E', '1', 7);
}

int GetOBD2FuelValue()
{
  //01e0
  ClearReceiveBuffer();
  Serial.write('0');
  Serial.write('1');
  Serial.write('e');
  Serial.write('4');
  Serial.write('\r');
  return ReceiveValueWithTimeout('4', 'E', '4', 7);
}

//01e5 Request current joystick button status 0 to 7
int GetOBD2JoyStatus0to7()
{
  //01e5
  ClearReceiveBuffer();
  Serial.write('0');
  Serial.write('1');
  Serial.write('e');
  Serial.write('5');
  Serial.write('\r');
  return ReceiveValueWithTimeout('4', 'E', '5', 7);
}

void loop()
{
  //unsigned long currentMillis = millis();
  int          i;
  char*          neutral = "n";                // sets the character for neutral
  char*          reverse = "r";                // sets the character for reverse
  unsigned int    rpmleds; //holds the 8 leds values
  char          message[8];     // variable to display the message on the display
  int            fuel;
  int            joybutton;
  byte          button;
  String          output;
  int            dots = 40;
  int            hours;
  int            mins;
  int            secs;
  int            millisec;
  long         inttime;

  gear = GetOBD2GearValue();

  while (gear >= 0)
  {
    //unsigned long currentMillis = millis();
    if (extractordetected == false)
    {
      SendEchoDisabled();   //Will cause a OK\r as answer from the extractor, ignored in this code
      extractordetected = true;
    }

    getAllData();

    speed == speed;

    if (rpmmax < rpmlast)
      rpmmax = rpmlast + 100;


    if (gear==0){
      sprintf(message,"%s:%s",rapport, reverse);
      lcd.setCursor(06, 1);
      lcd.write(2);
      lcd.write(8);
      rpmleds = map(rpm, 0, rpmmax, 0, 20);
      if (rpmleds >= 19) {
        delay(100);
        lcd.clear();
      }
    }


    if (gear==1){
      sprintf(marcha,neutral);//escreve a marcha ponto morto
      lcd.setCursor(06, 1);
      lcd.write(2);
      lcd.write(8);
      lcd.write(1);

      delay(100);
      lcd.clear();


    }
    if (gear==2){
      sprintf(message,"%s:%d",rapport, gear-1);
      lcd.setCursor(5,0);
      lcd.write(32);
      lcd.write(32);
      lcd.write(1);
      lcd.setCursor(5,1);
      lcd.write(32);
      lcd.write(32);
      lcd.write(1);
      rpmleds = map(rpm, 0, rpmmax, 0, 20);
      if (rpmleds >= 19) {
        delay(100);
        lcd.clear();
      }


    }
    if (gear==3){
      sprintf(message,"%s:%d",rapport, gear-1);
      lcd.setCursor(6,0);
      lcd.write(5);
      lcd.write(3);
      lcd.write(1);
      lcd.setCursor(6, 1);
      lcd.write(2);
      lcd.write(6);
      lcd.write(6);
      rpmleds = map(rpm, 0, rpmmax, 0, 20);
      if (rpmleds >= 19) {
        delay(100);
        lcd.clear();
      }
    }


    if (gear==4){
      sprintf(message,"%s:%d",rapport, gear-1);
      lcd.setCursor(6,0);
      lcd.write(5);
      lcd.write(3);
      lcd.write(1);
      lcd.setCursor(6, 1);
      lcd.write(7);
      lcd.write(6);
      lcd.write(1);
      rpmleds = map(rpm, 0, rpmmax, 0, 20);
      if (rpmleds >= 19) {
        delay(100);
        lcd.clear();
      }
    }


    if (gear==5){
      sprintf(message,"%s:%d",rapport, gear-1);
      lcd.setCursor(6,0);
      lcd.write(2);
      lcd.write(6);
      lcd.write(1);
      lcd.setCursor(6, 1);
      lcd.write(32);
      lcd.write(32);
      lcd.write(1);
      rpmleds = map(rpm, 0, rpmmax, 0, 20);
      if (rpmleds >= 19) {
        delay(100);
        lcd.clear();
      }


    }
    if (gear==6){
      sprintf(message,"%s:%d",rapport, gear-1);
      lcd.setCursor(6,0);
      lcd.write(2);
      lcd.write(3);
      lcd.write(4);
      lcd.setCursor(6, 1);
      lcd.write(7);
      lcd.write(6);
      lcd.write(1);
      rpmleds = map(rpm, 0, rpmmax, 0, 20);
      if (rpmleds >= 19) {
        delay(100);
        lcd.clear();
      }


    }
    if (gear==7){
      sprintf(message,"%s:%d",rapport, gear-1);
      lcd.setCursor(6,0);
      lcd.write(2);
      lcd.write(3);
      lcd.write(4);
      lcd.setCursor(6, 1);
      lcd.write(2);
      lcd.write(6);
      lcd.write(1);
      rpmleds = map(rpm, 0, rpmmax, 0, 20);
      if (rpmleds >= 19) {
        delay(100);
        lcd.clear();
      }


    }
    if (gear==8){
      sprintf(message,"%s:%d",rapport, gear-1);
      lcd.setCursor(6,0);
      lcd.write(2);
      lcd.write(8);
      lcd.write(1);
      lcd.setCursor(6, 1);
      lcd.write(32);
      lcd.write(32);
      lcd.write(1);
      rpmleds = map(rpm, 0, rpmmax, 0, 20);
      if (rpmleds >= 19) {
        delay(100);
        lcd.clear();
      }


    }
    if (gear==9){
      sprintf(message,"%s:%d",rapport, gear-1);
      lcd.setCursor(6, 0);
      lcd.write(2);
      lcd.write(3);
      lcd.write(1);
      lcd.setCursor(6, 1);
      lcd.write(2);
      lcd.write(6);
      lcd.write(1);
      rpmleds = map(rpm, 0, rpmmax, 0, 20);
      if (rpmleds >= 19) {
        delay(100);
        lcd.clear();
      }


    }
    if (gear==10){
      sprintf(message,"%s:%d",rapport, gear-1);
      lcd.setCursor(6, 0);
      lcd.write(2);
      lcd.write(3);
      lcd.write(1);
      lcd.setCursor(6, 1);
      lcd.write(7);
      lcd.write(6);
      lcd.write(1);
      rpmleds = map(rpm, 0, rpmmax, 0, 20);
      if (rpmleds >= 19) {
        delay(100);
        lcd.clear();
      }


    }
    if (gear==11){
      sprintf(message,"%s:%d",rapport, gear-1);
      lcd.setCursor(4,0);
      lcd.write(32);
      lcd.write(32);
      lcd.write(1);
      lcd.setCursor(4,1);
      lcd.write(32);
      lcd.write(32);
      lcd.write(1);
      lcd.setCursor(7,0);
      lcd.write(2);
      lcd.write(8);
      lcd.write(1);
      lcd.setCursor(7,1);
      lcd.write(2);
      lcd.write(6);
      lcd.write(1);
      rpmleds = map(rpm, 0, rpmmax, 0, 20);
      if (rpmleds >= 19) {
        delay(100);
        lcd.clear();
      }


    }
    if (gear==12){
      sprintf(message,"%s:%d",rapport, gear-1);
      lcd.setCursor(4,0);
      lcd.write(32);
      lcd.write(32);
      lcd.write(1);
      lcd.setCursor(4,1);
      lcd.write(32);
      lcd.write(32);
      lcd.write(1);
      lcd.setCursor(7,0);
      lcd.write(32);
      lcd.write(32);
      lcd.write(1);
      lcd.setCursor(7,1);
      lcd.write(32);
      lcd.write(32);
      lcd.write(1);
      rpmleds = map(rpm, 0, rpmmax, 0, 20);
      if (rpmleds >= 19) {
        delay(100);
        lcd.clear();
      }


    }
    if (gear==13){
      sprintf(message,"%s:%d",rapport, gear-1);
      lcd.setCursor(4,0);
      lcd.write(32);
      lcd.write(32);
      lcd.write(1);
      lcd.setCursor(4,1);
      lcd.write(32);
      lcd.write(32);
      lcd.write(1);
      lcd.setCursor(7,0);
      lcd.write(5);
      lcd.write(3);
      lcd.write(1);
      lcd.setCursor(7,1);
      lcd.write(2);
      lcd.write(6);
      lcd.write(6);
      rpmleds = map(rpm, 0, rpmmax, 0, 20);
      if (rpmleds >= 19) {
        delay(100);
        lcd.clear();
      }

    }
    sprintf(message,"%s",trmin);
    lcd.setCursor(11,0);
    lcd.write(message);
    sprintf(message,"%5d",rpm);
    lcd.setCursor(11,1);
    lcd.write(message);
    sprintf(message,"%s",speed1);
    lcd.setCursor(0,0);
    lcd.write(message);

    if (speed > 0){
      c = speed*3.595;
      sprintf(message,"%3d",c);
      lcd.setCursor(1,1);
      lcd.write(message);
    }
    delay(1);


    rpmlast = rpm;


  }
  extractordetected = false;
  digitalWrite(13, HIGH); //No connection, turn off the LED
  lcd.setCursor(0,0);
  lcd.write("[<-OPEN X-SIM->]");
  lcd.setCursor(0,1);
  lcd.write("  EURO TRUCK 2");
  delay(2000); //No serial connection, poll serial port all two seconds + readtimeout until a running extractor is detected
  lcd.clear();
}
exatamente o que eu queria, mais como fazer a ligação no arduino?
- leitegui
- Posts: 11
- Joined: Thu 8. Oct 2015, 02:24
- Has thanked: 0 time
- Been thanked: 0 time
Re: LCD DashBoard
![]() by bahzitchiu » Sat 4. Mar 2017, 18:26
by bahzitchiu » Sat 4. Mar 2017, 18:26
O esquema é para conectar no arduino é esse:
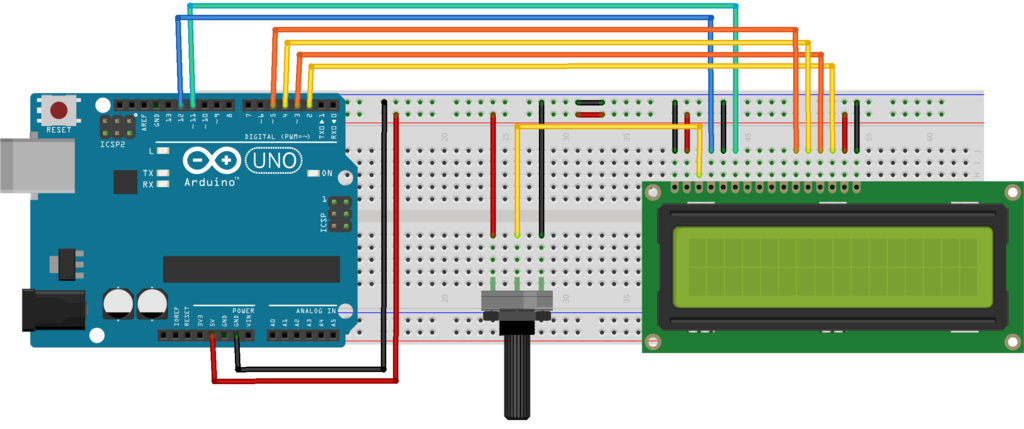
PS: o dimer não é necessário colocar, mas dai a luminosidade do LCD vai ficar sempre no máximo.
[ ]´s
PS: o dimer não é necessário colocar, mas dai a luminosidade do LCD vai ficar sempre no máximo.
[ ]´s
- bahzitchiu
- Posts: 9
- Joined: Wed 18. Jun 2014, 05:33
- Has thanked: 0 time
- Been thanked: 8 times
8 posts
• Page 1 of 1
Who is online
Users browsing this forum: No registered users and 1 guest
