Video plugin

The video motion plugin version 2.0

videopluginscreen3This addon software will help you to design a motion home cinema. Such a installation is good know out of the big Disneyland movie rooms. You will find actuators on every seat that moves to the current situation in the canvas in front the visitors. With this plugin you can use any media player video and make your own motions fitting to the movie. Therefore you are also able to use standard PAL or NTSC movies or the new HDMI formats. It is only limited by your hardware. The plugin can be runned as viewer or as editor. If you need your result as fullscreen video, you can also use the command line or double click the motion data file in your windows explorer. Because the media player is used, you are able to use all of its plugins and rightclick features. If you use a video with a unknown codec, you only have to install it for windows mediaplayer and this plugin works with it.
You are able to select any position in the video and design a force value from the current position to the next position. Therefore the plugin uses two windows for the start and end position of a motion.

Where you can get video material for your motion simulator ?
nolimits

  ekirmes

sybex


On the search for good movie sequences for this plugin I have found many different sources. The roller coaster nolimts could be recorded on DVD, but the force injector gives a real output. There are some other roller coaster simulators on the market (Sybex, Rolelrcoaster Tycoon) which are better. These could be realtime captured with some desktop to AVI programs. Also there are some pre rendered scifi roller coaster movies on the market. The best results delivers Amazon.de with the “eKirmes” DVD series. They bring out some 1st person real roller coaster videos and bundled them on about 5 DVD’s. These have Copyrights on it, so we cannot deliver a complete solution, but for private they are OK. A not good, but easy source is youtube.

What you have to do / Setup preparation

overlayoffFirst you have to insure that both video windows work correct. This should normally no problem for anyone but if a special codec pack was installed there could be different overlay default setups. So if the left or right movie window is black after you have loaded a movie you have to change this option on both windows. This could also happen, if you pause one of the players. Also there could be black playback. This could be fixed with the normal mediaplayer option with a right click on the video window. So rightclick and search for the overlay option. This depends on each used codec pack. Search for overlay options or filter options and deactivate them. In windows there is only one overlay possible, so better switch overlay to disabled and use DirectX or direct draw options. If you found the right option, both windows in the video plugin should display a picture if you pause them. A fresh windows installation would work as it is. If you want to make motion on your simulator, you should press the “try send data” button in the force sender application. Also you have to load the Video plugin .rn2 simulator profile file in the profiler2. The autostart trigger is also used by this plugin. Then you are able to see your input and sync the motion to your simulator because a hardware is every time delayed.
The left mediaplayer is the sending masterplayer to your simulator !
Your simulator will therefore only move, if you playback the left view.

Usage of the motion maker plugin

The slider on the left side represents the output value of the middle black marker of a selected x.y and z output. You have to click on a diagram to enable the work with this diagram. If you press the “Set red” button a direct line to the red marker line is generated. The red marker line represents the video position of the right media player. If you like to change only one axis you have to remove the check box entry on the axis you want to ignore. The slider on the right side is the complement of the left sliders. The plugin allows five undo steps. If you use single steps in the video, you have to know that a step forward will always be 200 ms and backward 100 ms. The recording frequency is 100 ms what are 10 times a second. The whole video motion cannot be longer than 2 hours. After you have saved the project you will find a similar motion file beside your video in the same directory and with the same name as your video but another extension which you are able to double click for playback. This file extension is .fsm and the video file has to be placed in the same directory. To make a change to the curves of the motion file, you have to stop both players.

The joystick mode:
If a joystick is present, you are able to activate it with the “Use joystick” check box. Normally you are ever time slower with your joystick input, so a motion would be played behind the video shows. Therefore you will find a offset slider near the joystick dialog. You should place it to about 200 ms to the future, this depends on your reaction time. Also this could help you, if your simulator also has a slow reaction time. If you have produced some unwanted false spikes, you can remove them with the above method to straighten the motion lines. (Set Red - Set Black)

Hotkeys for fullscreen mod of the left media player:
STRG+ALT+Q=Play
STRG+ALT+A=Pause
STRG+ALT+Y=Stop (Mouse pointer bug ?)
STRG+ALT+W=enter fullscreen
Esc=leave fullscreen (as usual)

If you are bothered about the blue control bars in the play mode, you can disable it in the mediaplayer options -> options. You can then control with the above hotkey controls.

Importing motion data of a acceleration logger hardware or other sources

You will find a import option in the file menu, which enables you to import motion data to your video from external sources.
The data’s have to look like this sample, divided by commas:

512, 512, 512,
513, 512, 512
...

The above sample shows a simple input with three data sources and can be extended to 6 data sources:

512, 512, 512, 512, 100, 130,
513, 512, 512, 512, 100, 130,
...

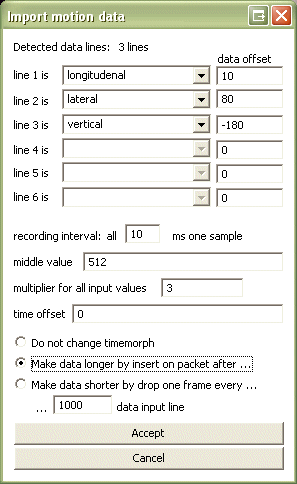
If asked, find your logger file and choose the fitting force description to the data lines you made.
videopluginscreenshot2


The top shows you how many lines are detected.
- Choose the fitting description with the combo boxes.
- Choose the sampling rate (here 100Hz = all 10ms one data row)
- Choose the middle value of the recorded values
- If needed write a data offset behind each line to reach the middle value
- Find a good multiplier value for good data usage (whole graph usage)
- Input a time offset from the start of the data’s to the video
- Tryout to shrink or enlarge the data’s for a synchrony video

This import steps should be done until the motion is fitting to the video.