|
Using Yoda with x-sim - Quickstart
Start Yoda and uncheck the mark on "delete released effect". Likewise no filter must be activated
This option will show you every short Force Feedback action without delete it out of the list if it is released.

1. If you have a dual-screen system you can display Yoda on a second monitor.
If not, you have to start Remote-Yoda on a second pc. Remote-Yoda is a just an external viewer for Yoda. If using Remote-Yoda, you have to enter there the IP-adress of the PC where the main application Yoda is running, in Remote-Yoda (enable UDP ports 4440-4450 or deactivate the firewall). After that set a check mark in the Yoda network-tab to activate the network in order to connect Yoda with Remote-Yoda. This hierarchy has to be maintained. Do not press the "start capture" button until both applications show that they are connected.
2. Start your game and look what happens. All DirectX effects that your game plays back during a race or flight will be displayed here in Yoda respective Remote-Yoda.
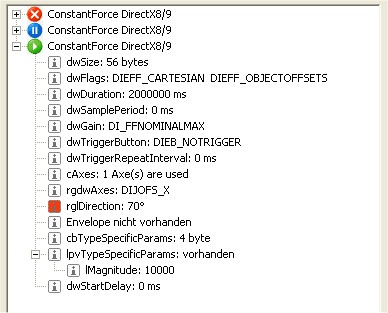
Yoda displays during playing a game many different Force-Feedback effects.
These can be expanded with the + symbol and exported. Therefor you have to click the right mouse button.
Important values for our purposes are mostly magnitudes.

Now the value will be displayed in the export window:

This list, together with the "ignore" settings represent a .yef file.
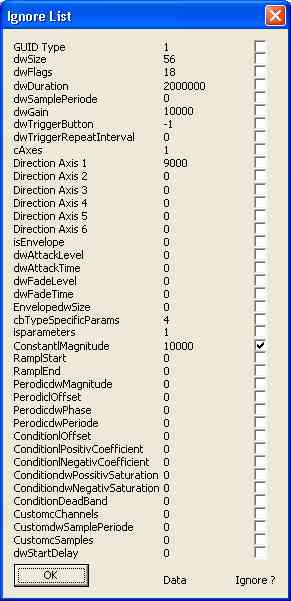
The ignore list list the redetection values of a force feedback effect. Yoda will look for such a effect. Unfortunately some game programmer will create the effects with different starting values. Then you are able to ignore some selected values and reduce therefore the precision of the correct redetection of a effect. You can also edit the .yef file in the windows editor and play with the values.
Example: collision
Drive your vehicle in the game towards an obstacle and watch which effects pops up, plays or changes values in the Yoda menue. These changes would be symbolized by a green 'playback' symbol or a red 'info' symbol.
Mostly these are sine-effects or effects who are combined with constant-forces.
Later you will be able to define a minimum value for each effect in the Force-Profiler, wich will initialize a simulator movement.
Example: G-effect
Drive through a curve and watch which effect, mostly constant-forces, pops up, plays or changes values in the Yoda2 menu. This value changes dependent from the driving direction (left or right curve) from a negative to a positive value.
If have done your notices, which effects you want to use, you will have to export them to the Force-Profiler2.
BTW, Yoda2 compares all DirectX effects with the ones you have selected to be exported. If similar effects are noticed by Yoda, they will be exported to Yoda likewise the selected effect.
Exported effects will be listed up in the Force-Profiler2 input setup section. The Force-Profiler2 transforms these values in simulator movement commands. There you can define, which effect will trigger which axis-movement with which speed. How to export effects is explained more precise in the export section.
Exported effects will be displayed bold in Yoda and are numbered from 01 to 40 in the Force-Profiler2 input setup list.
Important: save your export-list as .yef file, wich has to be entered one-time in the Force-Profiler!
After you have finished the search of the lateral force you can use the joystick pedal set movement to simulate the current speed or you can continue to the Injector manual and search for the speed value in a game. The Injector is then able to convert speed in acceleration and acceleration in real force values.
|
