|

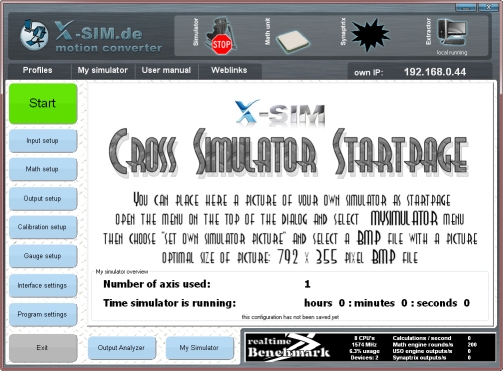
The X-Sim converter is a control software which help you to convert the unknown sized ingame values like speed or lateral forces in a hardware motion. Because every simulator or hardware gauge system has it’s own limitations and natural feelings you can resize the output results as you need. The converter starts with the “My simulator” page which simply shows you the loaded profile and some simulator relevant details like the amount of hours the simulator is working. You are able to load a picture of your own simulator to that page to identify the control pc with your simulator. (good if there are more than one simulator in the racing room)
This application is able to solve most of the actuator controls like pneumatic, hydraulic and electric. It is based on position target system and uses math plugins to resize incoming game values to a unified value size which is able to be transferred to a actuator with different movement accuracy. So you are able to use 8 bit pot input or higher with any actuator you own.
Features of the X-Sim converter:
- unlimited axis to control more than only the axis of a 6DOF simulator (wind engine, vibration seat, helmet mover, seat belt pressure, coffee automate)
- new gauge section which will control dashboard systems or let you design a desktop dashboard (with plugin system)
- hardware plugin system to easily add more hardware that is not suitable for USO
- math plugins to convert ingame data to the fitting simulator or to insert easily new special washouts routines
- advanced Universal Serial Output (USO) which exports the ingame data values like forces or gauges
- calibration routine for DIY actuators
- realtime benchmark tool to compare speeds and timings with other users
- 32bit values all over the application for future high resolution simulators (automatic reducement for HW plugins)
- logs ingame statistic to a CSV file, compatible to most office software to generate diagrams
- Read more about the gauge section
- Find out how you are able to make motion with the Universal Serial output (USO)
- Learn creating synaptrix movement control with non intelligent and cheap interfaces
- output ingame values to a ologfile for later race statistic
Quick Overview
You will find a status bar on the top, the possible setup dialog buttons left and a benchmark tool on the bottom of the converter main dialog. The status bar gives you information’s about your output usage and input usage. On the right side of the status bar the status of the input is shown. This is the information about a connected extractor application. The extractor will collect ingame values and send it to the converter which will make a motion profile to your actuator hardware. Is there no connection the converter cannot start its motion output. A connected extractor will be displayed with the ip address of the computer you are running the extractor application. The received values are shown in the input setup section which is shown if you have pressed the “input setup” button.
The synaptrix icon in the top bar will show you the status of the synaptrix if you have defined one. You can setup a actuator intelligent control with the “Output setup” button.
The math unit icon will display you the usage of the processor. It will differ between not used, used and realtime used.
The simulator icon shows you if the simulator is started or not.
On the bottom you will find the benchmark tool, which shows you the accuracy and speeds of any output and your computer.
The start button will allow you to start a motion if you have defined one. You can load and save the profiles with the file menu. It is possible to store only some sections of the profiler. This will be helpful to combine different simulator settings with load able gauge setups.
|

|
Here you will find all received values of the force sender application in a table with description and current ingame values.
|
|

|
The math section will convert the different sized ingame value to a unified 32 bit value and add some special effects like washouts or limiter.
|
|

|
The output section will specify how your simulator has to move to the values in the math section.
|
|

|
Here you place a pot calibration routine for your simulator to get new endpoint values, because pots are not stable enough.
|
|

|
Here you find the gauge section, which will support windows desktop gauges and LCD gauges or the visual 3D export.
|
|

|
This section is used to test found interfaces at your computer. You can tryout a new plugin file or simple set some valves or check inputs.
|
|

|
You can choose between realtime mode or a special priority tables for each part of the converter. Multi core support is placed on the right side.
|
|

|
The analyzer helps you to see the results of the math section to each other. It can compare the outputs with graphical oscilloscope lines.
|
|

|
My simulator is the start page of the X-Sim converter application and shows you some simulator information and your own setup picture.
|
|

|
After all the above setups are made or a fitting setup is loaded, you are able to start the hardware output with the start button. A X-Sim extractor connection is necessary to start the output. For non hardware gauge dashboard output, the start button is not needed.
|
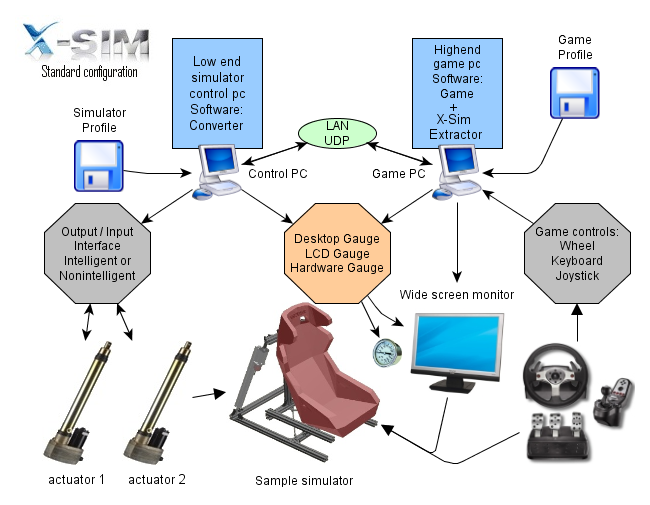
The X-Sim converter can be used on a single PC or over LAN.
Therefore the extractor application has a network LAN output and the converter a LAN input.
The standard setup is as shown below:

How to decide if a multi core or external control pc is necessary?
If you own a intelligent actuator system you have only to send ingame values to the drive, so you do not need a separated CPU core for a actuator control feedback circle. With the program setup you are additionally able to increase the accurate timings between every ingame output. If there is no asynchrony intelligent interface or the interfaces are not accurate enough you can switch to the windows controlled solution. The windows based control solution has to insure enough CPU usage left to absolve the control of the drive else the drive could go out of the mechanical boundary while it is busy with the game. So a external PC is the best solution here.
To insure a accurate output timing X-Sim offers the OS Kernel timing accuracy and the converter out of X-sim 3 owns a benchmark tool for all sections.
Please note that this is one of the advanced features of X-Sim which let you personally decide a good setup contrary to other software on the market.
X-Sim 3 comes with a standard setup which is designed for a good startup and then it can be modified to the best movement feelings.
Good knowledge about the coherence of hardware update rates and the highest ingame update rates is the condition to success here. You will need documentation’s and specifications of your hardware and the game software to compare the best results. You can ask for help in the forum.

The benchmark tool will help you with the accuracy and movement smoothness overview. More outputs per second will update your actuator more times and therefore the actuator will react to fast movements like street curbs or stones. A flight simulator does normally not need that fast updates, but racing games do. Also it will help you to find the fitting math update rate to your simulator output rate which should be nearly equal. High processor load could interrupt a constant update rate. The extractor application also owns a update rate which will help you to increase the update rate of a simulator system with faster computer setup in the future. You can reach a realtime near control to your simulator if you disable the artificial brakes during the control loops. This realtime near control will cost you the whole CPU usage, so a second control PC is necessary.
To insure you are not slow down your pc, there is a CPU usage display within that tool. A setup for a single ought to be around 25 percent of the whole CPU usage else a second PC is necessary which than can go up to 80 percent of the whole CPU usage.
Twenty percent as left CPU usage is good to avoid bottlenecks with the OS system threads.
- read more about the realtime setup in the “program setup” section
Notice about the used profile files / HowTo store your generated setup
The extractor of X-Sim 3 will always combine a extractor profile with your converter setup. However if you are developing a motion profile you can also save configuration locally. The converter comes along with some sample setup files which are always stored in the “my profiles” directory within the X-Sim 3 installation directory. Please use that directory to store the profiles because they are stored there “language save”. This means that other x-sim users in other countries can download the setup files from you and use them easily without to change the “program files” directory in the setup files. Every OS language pack would rename the standard folder for software to another name like “Programme” in german. So if you share such profiles you should use the standard setup for the profiles and the created desktop gauges. Also the migration to another PC will be save with this system.
|