|

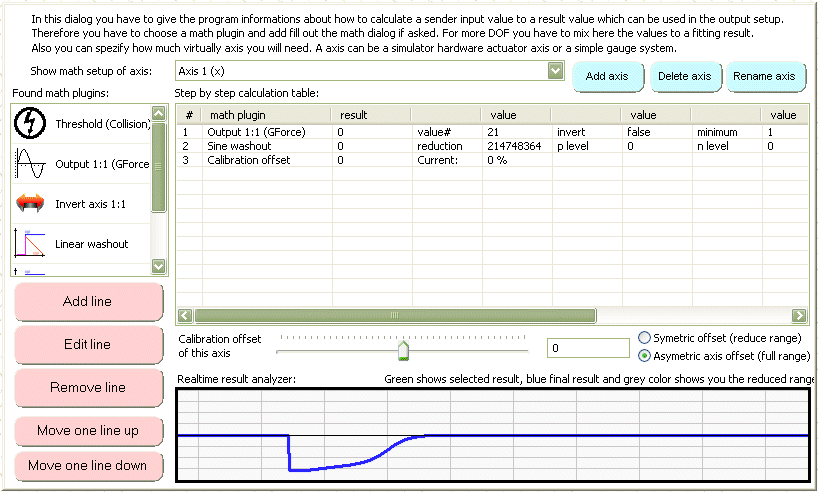
The math setup is a row by row calculation table which will use a Force-Sender input value and resize or transform it to a simulator actuator movement. Here you are able to mix effects of other inputs to one result value like it is done in a force feedback game input device. You can download the effects to the actuator with the output setup.
Setup steps
1.) First you have to add a axis to your profile. If there is a axis a synaptrix sequence and a USO interface is automatically created for you. You can change the axis name to what it will do on the simulator like “X-Axis” or “Left actuator”. You are able to insert as much axis as you like and you can improve your simulator with special actuators like a automatic seat belt that will tie you in the seat if you accelerate or some vibration motors in your seat as a tactile force feedback mat.
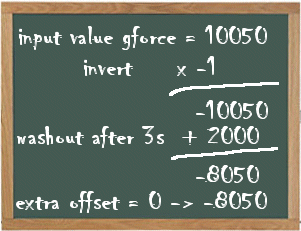
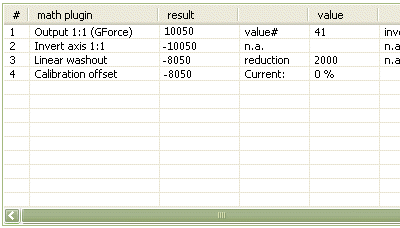
2.) Now you are able to insert a math plugin in the axis math list box. You can do this by selecting a math plugin out of the math plugin list and press the “Add line” button or simple double click one of the math plugins. The math list box will represent you a row by row calculation table like in the good old school time with the green chalk board. The first line is normally a “input plugin” which owns a Force-Sender read out. Then this resulting value can be transformed with the other plugins or overwritten/multiplied by another input plugin. This gives you the most freedom to insert as many effects as you like and also insert some special captured Yoda2 or Force-Injector effects.
 
This table shows you a list of the current plugins (press the pictures for more information’s):
|
|
input math plugin name
|
description
|
|

|
GForce / 1:1 plugin
|
The GForce plugin is the most used plugin. It will read a specified Force-Sender input value and resize it to a standard value form −2,147,483,648 to +2,147,483,647.
|
|

|
Threshold plugin
|
If a threshold value is used, a Force-Sender input value is compared with a specified limit value. If the value is reached a specified action is caused as the result value.
|
|
|
converting math plugin name
|
|
|

|
Invert plugin
|
Inserting a invert plugin will mirror the result signal on the middle line of the graph. This means a multiply with -1 with the last math line result.
|
|

|
Linear washout
|
The linear washout will reduce every math cycle the last math value by a value until it reaches the middle position. This is mostly used in flight simulators to increase movement.
|
|

|
Sine washout
|
The sine washout is the same as the linear washout but has a reduction transformation that is like a sine instead a linear reduction of the last math line value.
|
|

|
Smooth washout
|
The smooth washout is like the sine washout but only uses a smooth end of the washout effect. This is usefull for racing simulation washout.
|
|

|
Percentual scaler
|
A scaler will change the output of a math line without changing the force feelings. The percentual scaler will resize the whole input with a given percent value.
|
|

|
Logarithm scaler
|
The logarithm scaler will change the priorities of higher or lower forces. Higher forces can be used with smaller simulator movment because they are not often used.
|
|

|
Percentual limiter
|
This plugin cuts all values over and under a given level.
|
Each plugin result can be displayed as a green line to the blue result line in the graph box. You can watch your calculations in realtime without the need of a pressed start button in the main dialog. The values are always resized to a standard 32 bit value from −2,147,483,648 up to +2,147,483,647. This is the standard value size in the complete profiler application and is oversized for most of the simulators we will control with it. All output plugins or the USO setup will divide this value again to 16 bit or 8 bit values fitting to your interface. A profile with that big values is future save if you migrate to a more accurate simulator some years later.
3.) The offset line is always the last line in your calculation. It is the offset regulator for the center position of your simulator. If the center position is not accurate because of mechanical problems you can move the offset slider to reach the center. There are two solutions for that offset value. One will make a linear offset which will reduce the whole simulator movement, the other will use all movement and resize the movements from the middle position to their maximum values.
The linear offset will show the new maximum movement size with a grey area

The non linear offset will show the new asymetry with the grid lines

- continue to the output setup to download the math values to a simulator actuator |